
Send Data to Thingspeak Using GSM
In this post we are going to learn step by step how to upload sensor data to Thingspeak server and visually analyze the data in real-time. By the end of this article you will be able to upload any kind of sensor data to Thingspeak IoT platform using (GPRS) GSM module – SIM 800 / SIM 900.
We will see:
- Quick overview: What we are going to do?
- What is Thingspeak IoT analytics Platform?
- What is API Key?
- How to Sign up for Thingspeak and get API Key
- What is APN?
- Block Diagram
- Circuit Diagram
- Program code
- Why we are using GSM instead of ESP8266?
- How much GPRS data will be consumed?
- Prototype Image
- How to operate this circuit
Quick overview: What we are going to do?
- We will be sending temperature and humidity data of your surroundings to thingspeak platform where you can store, analyse and visualize the data using graphs and much more.
- We will be using DHT11 sensor and GSM modem for accessing GPRS so that we can send the data to the server and Arduino will act as the brain of the project.
- Two graphs will be generated on Thingspeak platform as we are sending only two data: temperature and humidity.
- The data on the thingspeak will be updated every 15 seconds.
What is Thingspeak IoT analytics Platform?
Thingspeak is open source platform made for Internet of Things (IoT) device developers and learners where developers can send and log data to the server, analyse, retrieve and store results using graphs with matlab support.
We can send up to 8 data simultaneously to the thingspeak account; the data uploaded will be converted to graphical representation automatically as illustrated below:
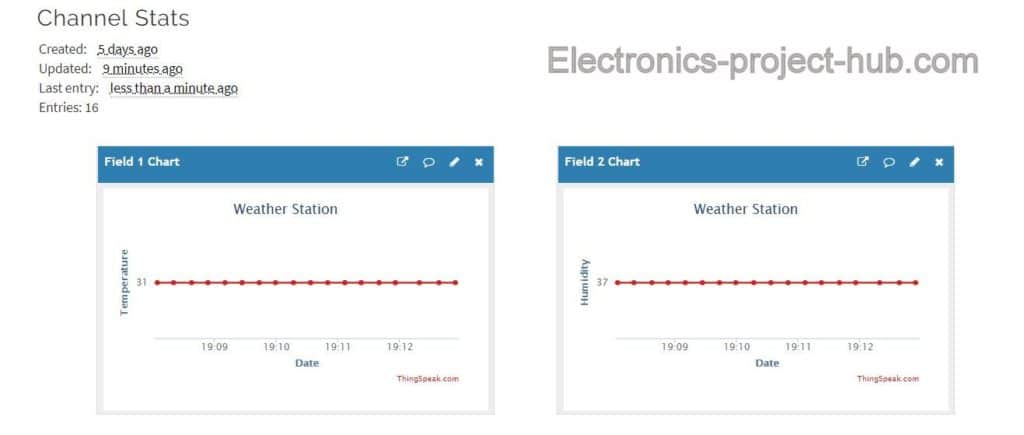
The straight line signifies that there was no temperature or humidity change during data logging. You can hover the mouse cursor on these dots to see the numerical data recorded at a particular local time. Thingspeak updates the data/graph every 15 seconds.
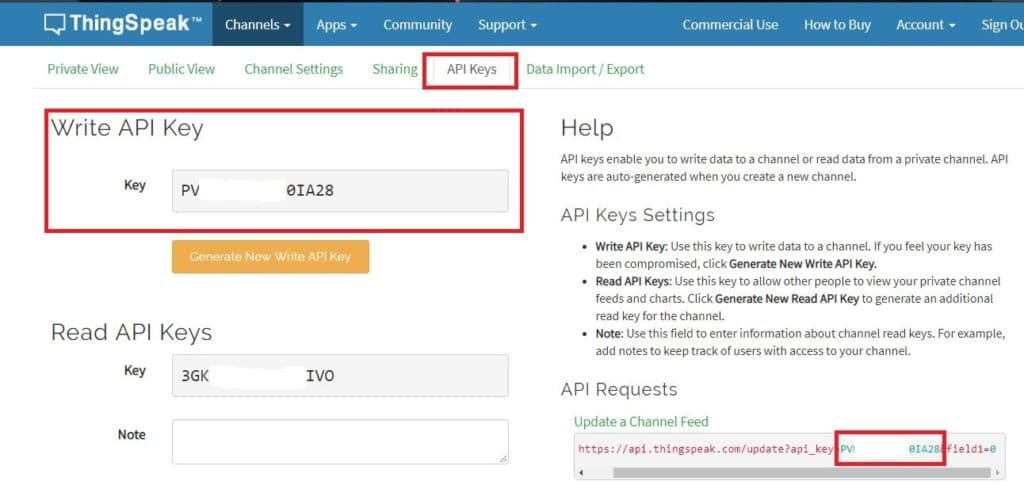
To send your data to thingspeak you need something called API key from your account which needs to be inserted in the given program code.
What is API key in Thingspeak?
API stands for “Application programing Interface”, on thingspeak it is a string of random character contains alphabets of lower and upper case, numbers and even special characters to identify your account and ensures that your sent data doesn’t end on someone else’s account and vice-versa.
There are two API keys generated while creating an account; one is called read API key and another is called write API key. We will be using only the write API key as we are going to write data to the thingspeak.
Now let’s see how to sign up and get the API keys for our project.
How to Sign up for Thingspeak and get API Key
- Signing up for thingspeak is simple, just click this link: https://thingspeak.com/users/sign_up and fill the necessary fields.
- Once this is done a verification link will be sent to your e-mail and click the received link.
Now go to your account and click on the API key tab and you can see your read and write API keys. Always keep your write API keys confidential.
-
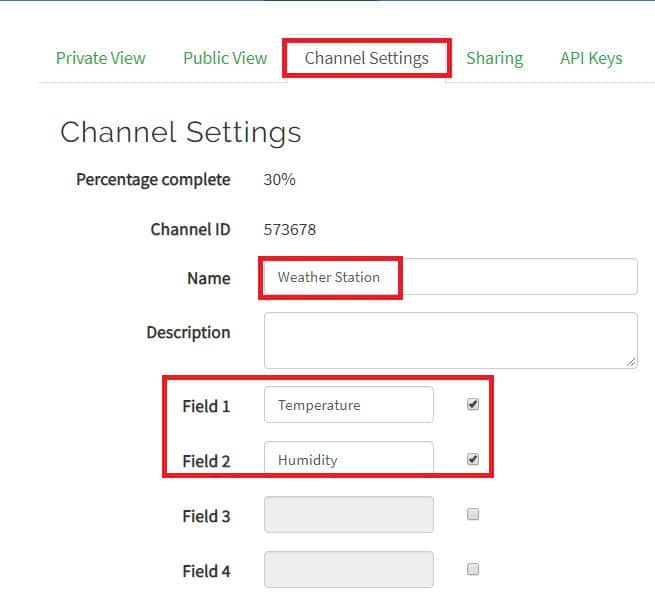
- Now click the channel settings, we will now enable the two channels (graphs) and will be writing necessary labels to make our readings easier. Just do the following changes in your account as shown below:
Editing Thingspeak Channels
- Now click the channel settings, we will now enable the two channels (graphs) and will be writing necessary labels to make our readings easier. Just do the following changes in your account as shown below:
-
- After making the changes scroll down and press “save”.

Thingspeak save button
- After making the changes scroll down and press “save”.
- Now you are ready with your thingspeak account and API key.
Now let’s learn about “APN” which is necessary for enabling the GSM modem to access internet.
What is APN?
APN stands for Access Point Name it is the gateway between carrier’s network and internet. GSM modem or any mobile device accessing internet must be configured with APN to present the wireless carrier. APN helps in getting the IP address and decides which security protocols should be used.
We should write the correct APN name for the mobile network / SIM that you have installed on the GSM modem in the program code, only then GSM modem can access the internet and send data to thingspeak platform.
For example:
- Airtel: airtelgrps.com (Tested)
- BSNL: bsnlnet (Tested)
- Vodafone: www
- Idea: imis
If you installed a BSNL SIM card to your GSM modem you should write “bsnlnet” as APN name in the given program code, similarly for Airtel etc.
NOTE 1: To find the APN names of other SIM mobile carriers, please search on Google.
NOTE 2: Don’t use “Jio” SIM card with GSM modems as they are 4G only network and GSM modem can only access 2G network. Other carriers should work without any issue as they are 2G backward compatible.
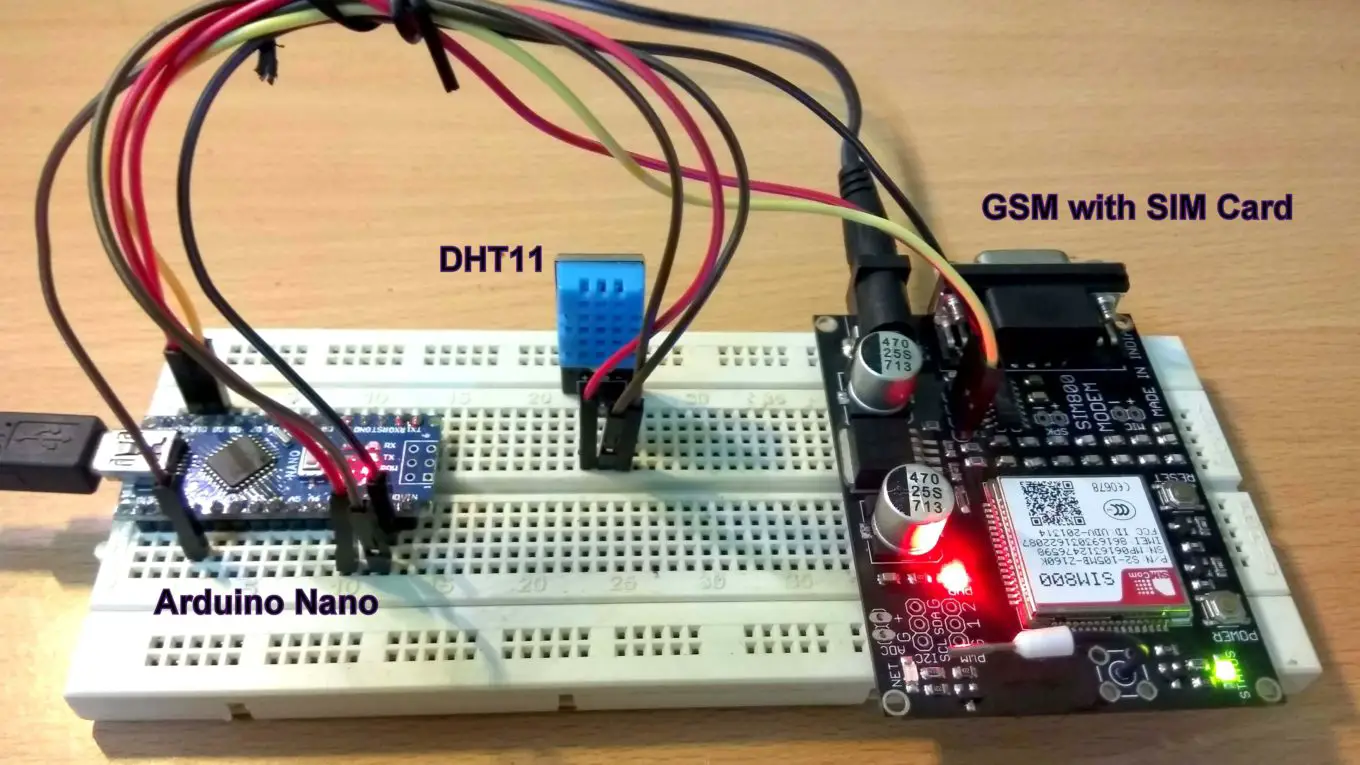
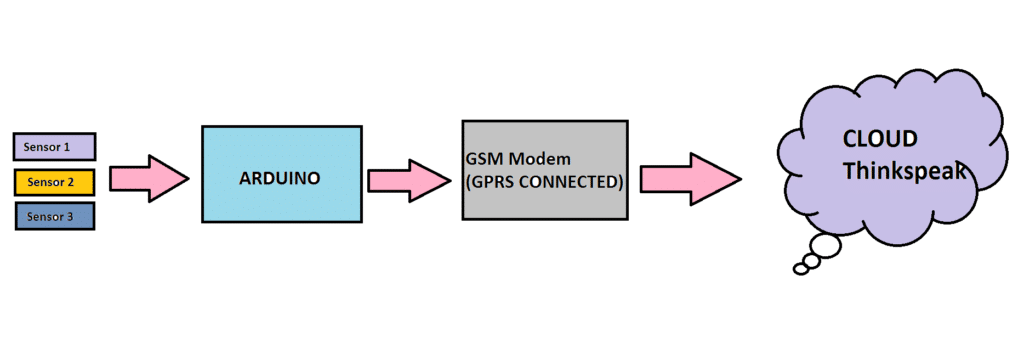
Block Diagram:
Circuit Diagram:
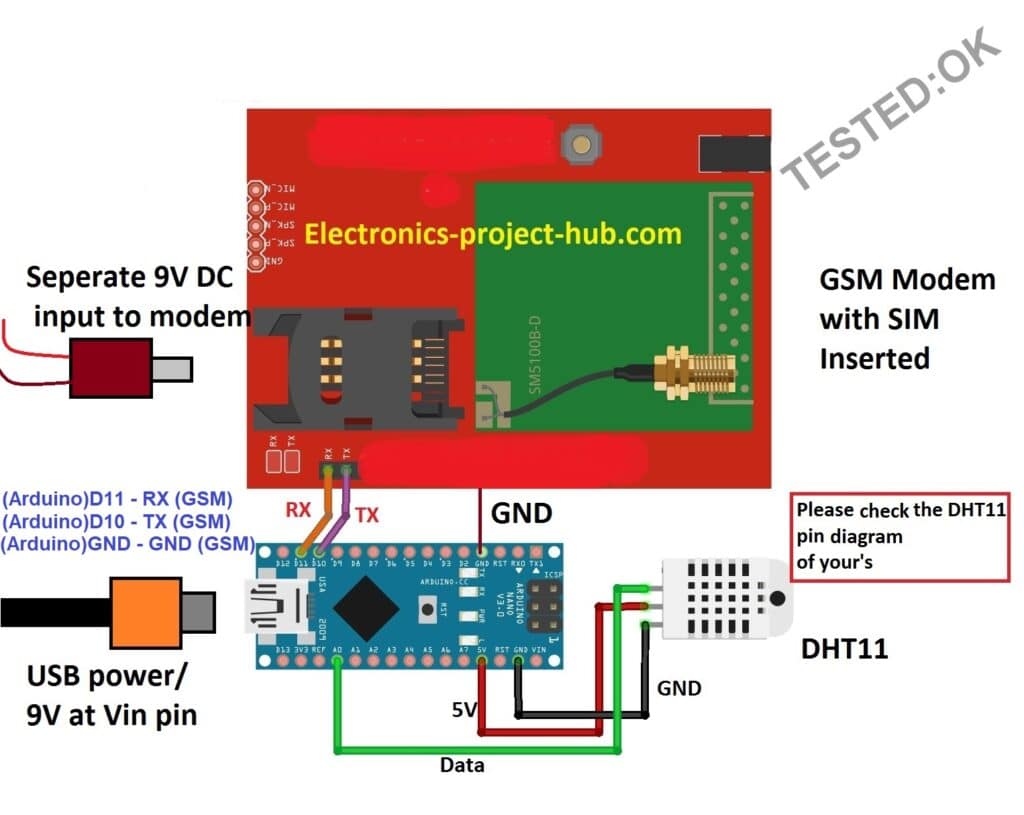
The circuit consists of a GSM modem for accessing GRPS/internet, one DHT11 sensor for sensing the ambient temperature and humidity and an arduino board of your choice.
The DHT11’s output is connected to pin A0 and the sensor is power by 5V from Arduino’s power output pins. You can either power the arduino with USB port or from external 9V input. The GSM modem should be powered from a wall adapter with at-least 1A current capacity, do not power it from Arduino.
Download DHT11 library file here: Click here
Program code: Verified and Error Free
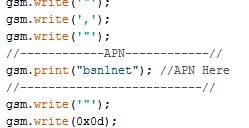
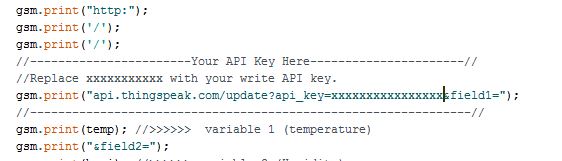
//-----Electronics-project-hub>com------//
#include <SoftwareSerial.h>
#include <dht.h>
dht DHT;
SoftwareSerial gsm(10, 11); // RX, TX
#define DHT11_PIN A0
int chk;
int humi = 0;
int temp = 0;
void setup()
{
  Serial.begin(9600);
  gsm.begin(9600);
  modem_init();
  data_init();
  internet_init();
}
void loop()
{
  chk = DHT.read11(DHT11_PIN);
  switch (chk)
  {
    case DHTLIB_OK:
      Serial.print("OK,\t");
      break;
    case DHTLIB_ERROR_CHECKSUM:
      Serial.print("Checksum error,\t");
      break;
    case DHTLIB_ERROR_TIMEOUT:
      Serial.print("Time out error,\t");
      break;
    case DHTLIB_ERROR_CONNECT:
      Serial.print("Connect error,\t");
      break;
    case DHTLIB_ERROR_ACK_L:
      Serial.print("Ack Low error,\t");
      break;
    case DHTLIB_ERROR_ACK_H:
      Serial.print("Ack High error,\t");
      break;
      default:
      Serial.print("Unknown error,\t");
      break;
  }
  Serial.print("Humidity: ");
  Serial.print(DHT.humidity, 1);
  Serial.print("%");
  Serial.print(",\t");
  Serial.print("Temperature: ");
  Serial.print(DHT.temperature, 1);
  Serial.println("*C");
  temp = DHT.temperature;
  humi = DHT.humidity;
  delay(2000);
  Send_data();
}
void modem_init()
{
  Serial.println("Please wait.....");
  gsm.println("AT");
  delay(1000);
  gsm.println("AT+CMGF=1");
  delay(1000);
  gsm.println("AT+CNMI=2,2,0,0,0");
  delay(1000);
}
void data_init()
{
  Serial.println("Please wait.....");
  gsm.println("AT");
  delay(1000); delay(1000);
  gsm.println("AT+CPIN?");
  delay(1000); delay(1000);
  gsm.print("AT+SAPBR=3,1");
  gsm.write(',');
  gsm.write('"');
  gsm.print("contype");
  gsm.write('"');
  gsm.write(',');
  gsm.write('"');
  gsm.print("GPRS");
  gsm.write('"');
  gsm.write(0x0d);
  gsm.write(0x0a);
  delay(1000); ;
  gsm.print("AT+SAPBR=3,1");
  gsm.write(',');
  gsm.write('"');
  gsm.print("APN");
  gsm.write('"');
  gsm.write(',');
  gsm.write('"');
  //------------APN------------//
  gsm.print("bsnlnet"); //APN Here
  //--------------------------//
  gsm.write('"');
  gsm.write(0x0d);
  gsm.write(0x0a);
  delay(1000);
  gsm.print("AT+SAPBR=3,1");
  gsm.write(',');
  gsm.write('"');
  gsm.print("USER");
  gsm.write('"');
  gsm.write(',');
  gsm.write('"');
  gsm.print("  ");
  gsm.write('"');
  gsm.write(0x0d);
  gsm.write(0x0a);
  delay(1000);
  gsm.print("AT+SAPBR=3,1");
  gsm.write(',');
  gsm.write('"');
  gsm.print("PWD");
  gsm.write('"');
  gsm.write(',');
  gsm.write('"');
  gsm.print("  ");
  gsm.write('"');
  gsm.write(0x0d);
  gsm.write(0x0a);
  delay(2000);
  gsm.print("AT+SAPBR=1,1");
  gsm.write(0x0d);
  gsm.write(0x0a);
  delay(3000);
}
void internet_init()
{
  Serial.println("Please wait.....");
  delay(1000);
  gsm.println("AT+HTTPINIT");
  delay(1000); delay(1000);
  gsm.print("AT+HTTPPARA=");
  gsm.print('"');
  gsm.print("CID");
  gsm.print('"');
  gsm.print(',');
  gsm.println('1');
  delay(1000);
}
void Send_data()
{
  gsm.print("AT+HTTPPARA=");
  gsm.print('"');
  gsm.print("URL");
  gsm.print('"');
  gsm.print(',');
  gsm.print('"');
  gsm.print("http:");
  gsm.print('/');
  gsm.print('/');
  //-----------------------Your API Key Here----------------------//
  //Replace xxxxxxxxxxx with your write API key.
  gsm.print("api.thingspeak.com/update?api_key=xxxxxxxxxxxxxxxx&field1=");
  //---------------------------------------------------------------//
  gsm.print(temp); //>>>>>>  variable 1 (temperature)
  gsm.print("&field2=");
  gsm.print(humi); //>>>>>> variable 2 (Humidity)
  gsm.write(0x0d);
  gsm.write(0x0a);
  delay(1000);
  gsm.println("AT+HTTPACTION=0");
  delay(1000);
}
//-----Electronics-project-hub>com------//
Note 3: Don’t forget to change the API key and APN in the above code.
Advantage of Using GSM Module:
We are utilizing GSM modem to access the internet instead of Wi-Fi boards like ESP8266 so that our projects will be independent of Wi-Fi which has limited range and you may not able to move your project anywhere as you wish or you might need to carry a Wi-Fi hotspot device beside the project.
Say your project need to be place somewhere at the top of a building to collect some data like air quality or atmospheric pressure, with GPRS based internet access you can carry the project anywhere, but if we utilize ESP8266 in the project to access internet you will need a Wi-Fi hotspot device near the project.
If you already own a GSM modem you no need to buy an ESP8266 module to access internet.
How much GPRS data will be consumed?
From our experiments and observation we found that, if the GSM modem sends data to thingspeak for straight 6 hours the data consumed is less than 10 KB.
You absolutely need not to worry that you will run out of mobile data. You can buy an entry level data pack plan from your carrier and you can run the project for several weeks, your bottleneck will your data pack’s validity period and not your data.
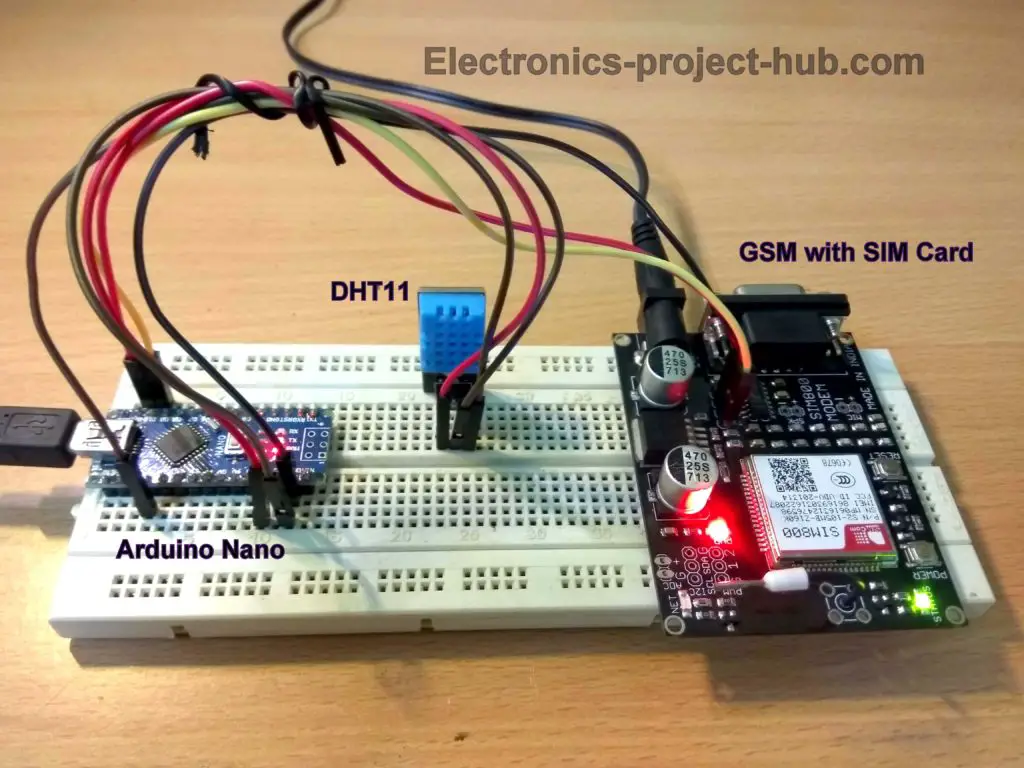
Prototype Image:
How to operate this project:
- With completed hardware setup install a valid SIM card with a data plan from your mobile carrier.
- Get the correct APN name for your SIM network carrier and paste it in the given program code.
- Paste the “write API key” from your thingspeak account to the given program code.
- Now upload the code to Arduino board.
- Open Serial monitor, you can see the sensor data.
- Now open the “private view” tab in the thingspeak site you will see dots appearing after 30 seconds, which is your temperature and humidity data from the sensor.
- You can logout of the thingspeak account from your PC and still the data will be uploading to the platform.
Not able to Upload data to Thingspeak? Here is the solution:

1) Problem: Your GSM is modem is not working correctly.
Soltuion: You must always check your GSM modem’s working functionality before any GSM based project. This can be done by powering ON the GSM modem with a valid SIM card inserted and dialing the number from another phone. You should hear ring.
Another way to test: There will be 3 LEDs in a GSM modem 1) Power 2) Status 3) Network. The Network LED flashes once every 3 second if it is latched in to a cellular network. It flashes a little faster in the beginning when it is trying to connect to a cellular network.
When GSM modem is connected to Internet, the Network LED flashes faster (twice every second). This is the point where data is sent to Thingsepeak.
2) Problem: Connection Error (No data from DHT11 sensor) / Sensor errors:
Solution: When you get “connection error” or any other error on serial monitor, this could be because you have connected the sensor terminals in wrong way or data pin is disconnected from A0 pin of Arduino. In the circuit diagram, DHT11 sensor’s terminals ( OUT, Vcc, GND) connection was in that way for us, but for you the terminals could be different.
Yes, for the same sensor type the pin configuration could be different, this is because the sensors are sourced from different manufacturer. We personally damaged a DHT11 sensor because we could not identify the terminals correctly and the terminals were not marked properly.
It is your task to identify the correct terminals for DHT11 and don’t blindly follow the circuit diagram. Powering the sensor incorrectly leads to damage like what happened to us.
3) Problem: Incorrect APN
Solution: Incorrect APN in the code will not connect your GSM modem to internet and the APN must be inside the ” ” mark. For example, APN for BSNL cellular provider:
What is my network provider’s APN?
A quick google search will tell you the APN. If not ask the customer support, they will provide you the right information.
4) Problem: You did not insert your write API key in the code correctly.
Solution: You need to insert the write API key like this:
The “xxxxxxxxxx” must be replaced with your write API key. The key must be inserted between ‘=’ and ‘&’ like this:
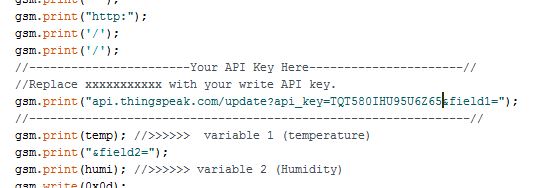
A vertical line was nothing but cursor in the screen shot.
5) Problem: Not activated a valid data plan for the SIM you inserted in GSM modem.
Solution: You have to activate a internet data plan for the SIM you have inserted in your GSM modem. You can do this by inserting the SIM to any phone and activating it. Please confirm it when you get the service SMS.
6) Problem: You did not configure your Thingspeak account as we mentioned in the beginning.
Solution: You need to label and enable only two fields in a channel as we mentioned.
7) Problem: Connected Tx and Rx pins incorrectly.
Solution: Check Tx and Rx pin connections as per the circuit and don’t forget to connect GND of GSM to GND of Arduino.
8) Problem: GSM modem is not getting adequate power.
Solution: You should not power the GSM modem from Arduino’s power pin even if modem has a 5V input pin. You should always use 9 to 12V wall adapter rated at 1A minimum. The GSM modem consumes up to 1A peak.
If you have any questions regarding this project feel free to express in the comment section, you will get a guaranteed reply from us.
Blogthor
My nick name is blogthor, I am a professional electronics engineer specialized in Embedded System. I am a experienced programmer and electronics hardware developer. I am the founder of this website, I am also a hobbyist, DIYer and a constant learner. I love to solve your technical queries via comment section.


But if my API is of other website and not of things peak, then is it enough to replace the thingspeak url with my websites url?
Or should I do any major changes(of course I will definitely change the apn).
Hi Rahul,
I don’t think you need any major changes, if you change the all the data in the code correctly it should work, give a try!
By the way which one are you using instead of thingspeak?
Regards
Dear sir,
Currently, I am working in a company. I am using my company’s API (a link) and with this API I must store the data into Oracle database’s columns of the table(like temperature value in temperature column, humidity value in humidity column). Can you help me with this.
We generally insert data into a column of the database using command:
“INSERT INTO table_weather(temperature, humidity) VALUES (’45’, ‘40%’)”;
We store this command in a string variable and we will send this through nodeMCU using API.
Thanks and Regards.
what do i have to do if i use firebase
Hi,
Sorry, we are not familiar with Firebase.
Regards
dear sir,
what all should i change if i am sending only 1 value i.e., sending only 1 field and no need of field 2.
Actually i am sending only ultrasonic sensor reading to field 1 that’s it.
can you modify the code for only 1 field.
Regards
Just remove the following from the code
gsm.print(“&field2=”);
gsm.print(humi); //>>>>>> variable 2 (Humidity)
Regards
so, no need of removing this?
gsm.write(0x0d);
gsm.write(0x0a);
and can i know what for these statements are? i know other gsm commands regarding messaging etc but don’t know these 2 lines.
Hi rahul,
You should not remove
gsm.write(0x0d);
gsm.write(0x0a);
These two lines are for carriage return and line feed which is equivalent to ctrl+Z
Regards
Sir I need to Pass the values of latitude and longitude values received from Gps to Thingspeak using the GPRS, Could you please help me regarding this.
Thank you
I will try to post such project if it is possible.
Regards
Sir Was in Urgency as should submit the project, it’ll be a great help if you please provide me your contact details to have a talk with you.
thank you
Hi pavan,
My suggestion is, it would better to get help from a project center if you are in urgent, we need to a good research before a project getting published on this site, so it may take time..
Regards
Hi!, Sir. What if i want to send the data to mySQL?. Is there any changes from this code?
Sorry Len, I don’t have experience with MySQL. If possible I will post it after gaining enough knowledge!
Regards
Yo, I am doing this with dht11 sensor. I am able to get readings on the serial monitor but it is not getting updated on the channel. Can you please suggest some way to check whether gsm communication is doing okay or not
Thanks
HI Ayan,
Try checking Tx and Rx connection, make sure you entered your thingspeak credentials correctly in the code. More importantly make sure you entered the correct APN for the SIM you inserted.
Regards
did everything still the data is not getting uploaded at the thingspeak platform
Hi,
It is not working because you made some mistake that you did not realized it yet 🙂
Please tell us whether network LED is blinking twice every second? and is temperature data displaying on serial monitor ? If these two happened, data will be updated on thingspeak.
Do not modify the code that you did not understand if you have done any (except API and APN), that will be guaranteed failure.
Regards
Hey, really well documented tutorial!
But i have a problem… my thingspeak doesnt update at all, and im using exactly this code
I noticed that in my Serial Monitor, the AT commands beginning at “AT+CPIN” doesnt display completely in the screen. The API KEY also gets cut in half in the Serial Monitor, could this be it?
Hi,
Did you write the correct APN for the sim card you inserted? Which SIM card do you use.
Make sure that your GSM modem is working properly. While accessing internet the GSM module’s network LED blinks rapidly.
Regards
Hello
I am from Greece and am a beekeeper.
Because I would like to place this project in a hive and would like to save the battery energy
I would be grateful if you could add the ability to put the system into energy-saving mode to have the battery longer life.
Best Regards
Alexandros
Hi,
It is possible to put the circuit in power saving mode its called sleep function, but it will hibernate the Arduino and will not collect data. Doing the same to GSM module will disconnect from the internet. So it will be like we switch off the circuit.
If you are operating this from a battery, the only thing we can do is power it from a bigger battery like 12V 7Ah or more. I believe this can power the circuit more than 2 days continuously from a single charge (7Ah).
Regards
Hello
The hives are 250 kilometers away from me.
If we can program the hours that the system wakes up, 4 measurements per day are enough !
Best Regards
Hi again!
You can program the circuit to update data 4 times a day. But the arduino cannot wake by itself. We need external trigger to wake, so a circuit must keep track of time actively, that will make our point useless (to keep the arduino in sleep mode to save power). My best suggestion would be power the GSM and Arduino witha a decent 9-12V power adapter.
Regards
this code do not work with SIm808 can you help me and my SimCard is Vodafone what is its APN
Hi,
Did you read the full article? The APN is clearly mentioned. You need to read the whole post patiently and make the necessary changes in your thingspeak account, hardware and also in the code, only then it works.
SIM 808 may also use same AT commands as SIM 800 OR 900, so it should work for you too. The network LED should blink rapidly when it is connected to internet.
Regards
hi, i’m beginner doing this stuff. I have some problem, i can’t see the sensor data when i click on serial monitor
Connect error, Humidity: 0.0%, Temperature: 0.0*C
what should i do?
Hi,
“Connection error” Means the following:
You connected the data pin of DHT11 to wrong arduino pin. OR you connected the power to DHT11 incorrectly. My pin diagram for DHT11 is different from your DHT11 sensor, you need to identify the correct +ve, -Ve and DATA pin for your particular DHT11 sensor.
This same silly mistake is committed by many.
If you have any questions feel free to ask us.
Regards
Hi, thank you so much for your reply, i already changed the connection but now pop up check sum error on serial monitor, what should i do?
Checksum error, Humidity: 64.0%, Temperature: 30.0*C
Hi,
Check for loose connections of sensor wire that connectes to arduino. Or the sensor is damaged because you probably powered the sensor incorrectly for some time.
Hi there!
I want to update my digital data to things speak, just three digital values high or low from sensor. What changes do I need to perform in code? I have created three fields on single channel in
Thanks in advance.
Best Regards,
Ghauri
Hi,
To upload 3 digital data (one digit per field), you need to do this:
//———————–Your API Key Here———————-//
//Replace xxxxxxxxxxx with your write API key.
gsm.print(“api.thingspeak.com/update?api_key=xxxxxxxxxxxxxxxx&field1=”);
//—————————————————————//
gsm.print(temp); //>>>>>> variable 1 (temperature)
gsm.print(“&field2=”);
gsm.print(humi); //>>>>>> variable 2 (Humidity)
gsm.print(“&field3=”);
gsm.print(new_variable); //>>>>>> variable 3 (your new variable)
gsm.write(0x0d);
gsm.write(0x0a);
The “new_variable” is the data you need to get from sensor.
and what changnes needs to be done in void loop() ?
You need to read the pin and store the data in a variable.
case DHTLIB_OK:
^
thingspeak:25:10: error: ‘DHTLIB_ERROR_CHECKSUM’ was not declared in this scope
case DHTLIB_ERROR_CHECKSUM:
^
thingspeak:28:10: error: ‘DHTLIB_ERROR_TIMEOUT’ was not declared in this scope
case DHTLIB_ERROR_TIMEOUT:
^
thingspeak:31:10: error: ‘DHTLIB_ERROR_CONNECT’ was not declared in this scope
case DHTLIB_ERROR_CONNECT:
^
thingspeak:34:10: error: ‘DHTLIB_ERROR_ACK_L’ was not declared in this scope
case DHTLIB_ERROR_ACK_L:
^
thingspeak:37:10: error: ‘DHTLIB_ERROR_ACK_H’ was not declared in this scope
case DHTLIB_ERROR_ACK_H:
^
exit status 1
‘DHTLIB_OK’ was not declared in this scope
Download and install dth11 library using the given link in the post.
Regards
Really nice tutorial…………………………………….:)
Before testing with GSM module you can also test with your google browser.
Simply paste the URL as like below in browser you found that your data is updated in private view:
http://api.thingspeak.com/update?api_key=xxxxxxxxxxxxxxxx&field1=50.02
xxxxxxxxxxxxxxxx: paste here your API write key
Thanks for your tips.
i replaced humidity sensor with lm35 temperature sensor but temperature value is not updated on thingspeak.
please help me, i share the code
#include
SoftwareSerial gsm(10, 11); // RX, TX
int temp = 0;
void setup()
{
Serial.begin(9600);
gsm.begin(9600);
modem_init();
data_init();
internet_init();
}
void loop()
{
temp=analogRead(A0);
temp=temp*0.4885;
Send_data();
}
void modem_init()
{
Serial.println(“Please wait…..”);
gsm.println(“AT”);
delay(1000);
gsm.println(“AT+CMGF=1”);
delay(1000);
gsm.println(“AT+CNMI=2,2,0,0,0”);
delay(1000);
}
void data_init()
{
Serial.println(“Please wait…..”);
gsm.println(“AT”);
delay(1000); delay(1000);
gsm.println(“AT+CPIN?”);
delay(1000); delay(1000);
gsm.print(“AT+SAPBR=3,1”);
gsm.write(‘,’);
gsm.write(‘”‘);
gsm.print(“contype”);
gsm.write(‘”‘);
gsm.write(‘,’);
gsm.write(‘”‘);
gsm.print(“GPRS”);
gsm.write(‘”‘);
gsm.write(0x0d);
gsm.write(0x0a);
delay(1000); ;
gsm.print(“AT+SAPBR=3,1”);
gsm.write(‘,’);
gsm.write(‘”‘);
gsm.print(“APN”);
gsm.write(‘”‘);
gsm.write(‘,’);
gsm.write(‘”‘);
//————APN————//
gsm.print(“airtelgprs.com”); //APN Here
//————————–//
gsm.write(‘”‘);
gsm.write(0x0d);
gsm.write(0x0a);
delay(1000);
gsm.print(“AT+SAPBR=3,1”);
gsm.write(‘,’);
gsm.write(‘”‘);
gsm.print(“USER”);
gsm.write(‘”‘);
gsm.write(‘,’);
gsm.write(‘”‘);
gsm.print(” “);
gsm.write(‘”‘);
gsm.write(0x0d);
gsm.write(0x0a);
delay(1000);
gsm.print(“AT+SAPBR=3,1”);
gsm.write(‘,’);
gsm.write(‘”‘);
gsm.print(“PWD”);
gsm.write(‘”‘);
gsm.write(‘,’);
gsm.write(‘”‘);
gsm.print(” “);
gsm.write(‘”‘);
gsm.write(0x0d);
gsm.write(0x0a);
delay(2000);
gsm.print(“AT+SAPBR=1,1”);
gsm.write(0x0d);
gsm.write(0x0a);
delay(3000);
}
void internet_init()
{
Serial.println(“Please wait…..”);
delay(1000);
gsm.println(“AT+HTTPINIT”);
delay(1000); delay(1000);
gsm.print(“AT+HTTPPARA=”);
gsm.print(‘”‘);
gsm.print(“CID”);
gsm.print(‘”‘);
gsm.print(‘,’);
gsm.println(‘1’);
delay(1000);
}
void Send_data()
{
gsm.print(“AT+HTTPPARA=”);
gsm.print(‘”‘);
gsm.print(“GET”);
gsm.print(‘”‘);
gsm.print(‘,’);
gsm.print(‘”‘);
gsm.print(“http:”);
gsm.print(‘/’);
gsm.print(‘/’);
//———————–Your API Key Here———————-//
//Replace xxxxxxxxxxx with your write API key.
gsm.print(“api.thingspeak.com/update?api_key=SHO3KS2EKJ37GYHV&field1=”);
//—————————————————————//
Serial.println(temp); //>>>>>> variable 1 (temperature)
//gsm.print(“&field2=”);
//gsm.print(humi); //>>>>>> variable 2 (Humidity)
gsm.write(0x0d);
gsm.write(0x0a);
delay(1000);
gsm.println(“AT+HTTPACTION=0”);
delay(1000);
}
please check what is the error in this code because data is not sending to the thingspeak
Hi,
Did this code compiled correctly?
The header file is missing #include
You have to remove field 2.
yes sir compile successfully temperature value is seen on serial monitor but temperature is not updated on thingspeak, i again send the code please cheak , what is the problem?
#include
SoftwareSerial gsm(10, 11); // RX, TX
int temp = 0;
void setup()
{
Serial.begin(9600);
gsm.begin(9600);
modem_init();
data_init();
internet_init();
}
void loop()
{
temp=analogRead(A0);
temp=temp*0.4885;
Send_data();
}
void modem_init()
{
Serial.println(“Please wait…..”);
gsm.println(“AT”);
delay(1000);
gsm.println(“AT+CMGF=1”);
delay(1000);
gsm.println(“AT+CNMI=2,2,0,0,0”);
delay(1000);
}
void data_init()
{
Serial.println(“Please wait…..”);
gsm.println(“AT”);
delay(1000); delay(1000);
gsm.println(“AT+CPIN?”);
delay(1000); delay(1000);
gsm.print(“AT+SAPBR=3,1”);
gsm.write(‘,’);
gsm.write(‘”‘);
gsm.print(“contype”);
gsm.write(‘”‘);
gsm.write(‘,’);
gsm.write(‘”‘);
gsm.print(“GPRS”);
gsm.write(‘”‘);
gsm.write(0x0d);
gsm.write(0x0a);
delay(1000); ;
gsm.print(“AT+SAPBR=3,1”);
gsm.write(‘,’);
gsm.write(‘”‘);
gsm.print(“APN”);
gsm.write(‘”‘);
gsm.write(‘,’);
gsm.write(‘”‘);
//————APN————//
gsm.print(“airtelgprs.com”); //APN Here
//————————–//
gsm.write(‘”‘);
gsm.write(0x0d);
gsm.write(0x0a);
delay(1000);
gsm.print(“AT+SAPBR=3,1”);
gsm.write(‘,’);
gsm.write(‘”‘);
gsm.print(“USER”);
gsm.write(‘”‘);
gsm.write(‘,’);
gsm.write(‘”‘);
gsm.print(” “);
gsm.write(‘”‘);
gsm.write(0x0d);
gsm.write(0x0a);
delay(1000);
gsm.print(“AT+SAPBR=3,1”);
gsm.write(‘,’);
gsm.write(‘”‘);
gsm.print(“PWD”);
gsm.write(‘”‘);
gsm.write(‘,’);
gsm.write(‘”‘);
gsm.print(” “);
gsm.write(‘”‘);
gsm.write(0x0d);
gsm.write(0x0a);
delay(2000);
gsm.print(“AT+SAPBR=1,1”);
gsm.write(0x0d);
gsm.write(0x0a);
delay(3000);
}
void internet_init()
{
Serial.println(“Please wait…..”);
delay(1000);
gsm.println(“AT+HTTPINIT”);
delay(1000); delay(1000);
gsm.print(“AT+HTTPPARA=”);
gsm.print(‘”‘);
gsm.print(“CID”);
gsm.print(‘”‘);
gsm.print(‘,’);
gsm.println(‘1’);
delay(1000);
}
void Send_data()
{
gsm.print(“AT+HTTPPARA=”);
gsm.print(‘”‘);
gsm.print(“GET”);
gsm.print(‘”‘);
gsm.print(‘,’);
gsm.print(‘”‘);
gsm.print(“http:”);
gsm.print(‘/’);
gsm.print(‘/’);
//———————–Your API Key Here———————-//
//Replace xxxxxxxxxxx with your write API key.
gsm.print(“api.thingspeak.com/update?api_key=SHO3KS2EKJ37GYHV&field1=”);
//—————————————————————//
Serial.println(temp); //>>>>>> variable 1 (temperature)
gsm.write(0x0d);
gsm.write(0x0a);
delay(1000);
gsm.println(“AT+HTTPACTION=0”);
delay(1000);
}
Well, we are already working on LM35 Thingspeak project exactly like this one, if you could wait for 3 to 4 days, you will get the solution.
Regards
ok sir i will wait your response
Hi
we have publish the post: https://electronics-project-hub.com/send-lm35-data-to-thingspeak-esp8266-gsm-nodemcu/
Regards
sir I am waiting for your response
i m facing this problem again for sending temperature value from lm35 to thingspeak using gsm module
Hi shyam,
There are some hardware issue with your circuit, I suspect the culprit is GSM module. The new code you commented with APN and API key is correct.
it is easy to say that your circuit is not working, but you have to debug it. Follow the FAQ.
For any help you can ask us again!
Regards
Hello Sir,
I am doing the same project with 800l and DHT22 sensor. I get the output in serial monitor, but thinkspeak is not being updated. My GSM module blinks twice a second (it means the internet is working). I changed APN and API key too. Do you think it is problem of Tx and Rx? But if Tx and Rx were connected wrongly, AT commands for internet and others would not start. I have no idea what is happening.
Hi,
The given code does not support DHT22 sensor. I hope you are not getting garbage value on serial monitor.
Did you connect GND of Arduino to GND of GSM? Try flipping Tx and Rx connections. Is your SIM card is 2G/GSM compatible?
Is zeros are being updated on thingspeak? or nothing on Thingspeak?
Regards
I tried sim 800l module interfacing to arduino uno and i connected as per refereed circuit diagram but i connected DC-DC buck converter also in sim 800l module the signal was not defecting even buck-converter also connected what is the problem i dont know could any one know please give reply.
Hi Satya,
Can you please tell us how did you conclude that your GSM modem is not getting signal?
Did you test your GSM module by calling to it?
Regards
Hi I am using SIM800A quad-core GSM module and i want to send data to thingspeak all commands work ok but can’t update my channel here is my AT commands list and response
pls help me out
AT
OK
AT+CMGF=1
OK
AT+CNMI=2,2,0,0,0
OK
AT+CPIN?
+CPIN: READY
OK
AT+SAPBR=3,1,”Contype”,”GPRS”
OK
AT+SAPBR=3,1,”APN”,”airtelgrps.com”
OK
AT+SAPBR=3,1,”USER”,””
OK
AT+SAPBR=3,1,”PWD”,””
OK
AT+SAPBR=1,1
OK
AT+HTTPINIT
OK
AT+HTTPPARA=”CID”,1
OK
AT+HTTPPARA=”URL”,”https://api.thingspeak.com/update?api_key=O2IY40XEUBA48R2V&field1=70″
OK
AT+HTTPACTION=0
OK
+HTTPACTION: 0,603,0
Hi,
Please give us the full picture of your project, it seems like you have modified the code. How did you managed to see above mentioned activity on serial monitor ? or by intercepting D11 and D10 pins?
Regards
Hi Thanks for your Valuable Replay
I use the SIM800A module with FTDI and send AT command from Putty terminal and all commands work properly but in my channel does not update.
I also check my airtel sim-card it’s working.
Hi,
There are critical commands that need to be executed to latch the GSM to internet, such commands are not executed in your previous commands.
Even if a single command not executed or if execution sequence is incorrect, data will not get updated on thingspeak.
You should not manually execute the AT commands here, moreover data is sent to thingspeak in several loops which you cannot do manually.
Regards
Sir/Madam,
We are uploading a string of size ~255 bytes. Only the first two characters get
uploaded. What to do. Is there a limit to upload size.
Thank You
Hi,
With this program code which is formatted to send only two integer (variable) data and Thingspeak can only show numeric data on its graph.
So there is no surprise why only first two digits/char got uploaded.
Only send numeric data to thingspeak.
Regards
I have used Arduino Uno for this project. I am getting checksum error at the serial monitor and data doesn’t show on thingspeak.please help.
thank you.
Hi,
You have connected sensor’s terminal in wrong way or your DHT11 sensor is damaged.
Please identify the correct pins for your DHT11. The pin configuration for your DHT11 could differ from the one in circuit diagram because DHT11 are sourced from several different manufacturers.
Regards
i got it. there is no checksum error at all but i am unable to send data to thingspeak.everythings seems fine with gsm module i tried both sim800c & sim800a. using idea with “imis” apn.
How does your network LED behave on your GSM board. It should be blinking faster than usual and this is the indication that your GSM module is connected to internet.
Regards
It blinks 2time per second…I tried AT commands as well it was working but unable to send data to thingspeak.
Hi,
2 times a second is that a normal rate usually network LED blink on your GSM? You should see increase in flashing of the network LED that is the point where GSM is connected to internet.
I am not quit sure what do you mean by “I tried AT commands”, The program code also uses AT commands to connect the GSM to internet/Thingspeak.
OR did you entered AT commands manually, if that is the case it won’t work. The AT commands are executed in loops in milliseconds and seconds time.
Regards
THANKS…FINALLY SOLVED
Congrats! I am gland it worked.
Dear,
I’m trying to use SIM900 with this tutorial. I have connected Arduino pins ~10 and ~11 to GSM900 UART pins RXD and TXD. As well as GND to GND. When I open my serial monitor, everything works fine it’s reading the Temperature and Humidity. Sometimes I get the Checksum error, but most of the time it’s OK. SIM900 is working, the NetLight is blinking every 3 seconds, but data is not sent to Thingspeak.
Do you have an idea, am I doing something wrong with the connection between SIM900 and Arduino UNO? Any suggestions?
Hi,
We understood your problem, could you please check you wire connection again: it should be pin 11 to Rx and pin 10 to Tx and GND to GND.
Check sum error could due to loose wire connect of DHT sensor.
If your netLED blinks once every 3 seconds it means it just connect to a network. It should blink twice every second only then it is connected to internet.
Regards
Thank you for the above article. I am using the same code for gsm.
But I need to send data to thingspeak every second. Does those data count or will be neglected ?
In real, I am not getting any thing in thingspeak. only one or 2 data out of 10.
Hi,
The thingspeak server only accepts data once every 20 seconds, this is probably because they don’t want to overload their servers.
I have tried all the possible ways but couldn’t able to figure out the reason why my data is not been sent to cloud. my sim is idea and hence I used imis. Is there any problem with roaming as it is in roaming.
How is your network LED behaving on your GSM module, it should blink twice every second.
Hello,
is it possible to use A6 GSM & GPRS module instead of SIM 800 / SIM 900 GSM module ?
Hi,
As long as A6’s AT commands are same as SIM 800 / 900 it should work just fine, which I think it is same…..
Regards
I’m usng A6 GSM and GPRS module. the serial monitor displays the below output. but the data is not uploaded in to thingspeak ,How can i fix this problem ?
serial monitor output:
Please wait…..
Please wait…..
Please wait…..
Checksum error, Humidity: 53.0%, Temperature: 25.0*C
Checksum error, Humidity: 54.0%, Temperature: 25.0*C
Checksum error, Humidity: 53.0%, Temperature: 25.0*C
Checksum error, Humidity: 53.0%, Temperature: 25.0*C
Checksum error, Humidity: 53.0%, Temperature: 25.0*C
Checksum error, Humidity: 54.0%, Temperature: 25.0*C
Sorry for late reply, it looks like your sensor is damaged due to some reason or could be because of loose wire connection.
I’m using A6 GSM and GPRS module. The serial monitor displays the out put, but the data is not uploaded to the thingspeak . How can i fix this problem? please help me.
I have provided a FAQ section in the article and kindly follow it sincerely.
how can i fix, the serial monitor displays the following error +CME ERROR:50, +CME ERROR:53 and +CME ERROR:58 ? tanks in advance !
We never tested A6 GSM modem with this circuit and never understood its error codes, but we found this link where definitions of the error codes are explained.
Regards
Tanks for your help , now its working properly .
I am really glad your project worked!
i have connected the GSM modem to my PC and then i am send commands to the GSM Modem using terminal Software.
This is what i am sending:
AT
AT+CPIN?
AT+CREG?
AT+CGATT?
AT+CIPSHUT
AT+CIPSTATUS
AT+CIPMUX=0
AT+CSTT=”www”
AT+CIICR
AT+CIFSR
AT+CIPSTART=”TCP”,”api.thingspeak.com”,”80″
AT+CIPSEND
GET http://api.thingspeak.com/update?api_key=X4L3QD19Q7YSLK3J&field1=125
#026
When i use GET instruction and then send 026 i get SEND OK from the modem and then CLOSED but thingspeak channel is not updated.
Please help
Hi,
Did you manually typed those commands? The values don’t get updated on Thingspeak if you do that, the commands must be executed in loops so that your data is sent multiple times to Thingspeak server and only few data gets accepted.
Regards
says only
Please wait…..
Please wait…..
Please wait…..
Please wait…..
Please wait…..
Please wait…..
Please wait…..
Please wait…..
Please wait…..
sorry for the late reply…
Please check your connections one more time.
i did but still nothing.
when i deal to the sim it will ring and when i try AT commands in serial monitor nothing will appear
i used gsm 900a
Hi,
You cannot manually type the commands to serial monitor and expect result on thingspeak or on the serial monitor, the code was not designed for accepting AT commands manually.
Regards
Hi, i follow your tutorial and everything seems to work, but after i put another chip completly working as the other it stops working with ANY chip. To be exact, the command AT+SAPBR=1,1 does not work, and i don’t understand why use this stead of cops(or what this exacly does). when i take away the chip from my fone cops show me that it is registrated on the right network, why do it again?
I’m working on a project that needs to send data to thingspeak via a SIM800L module. I have tried your code but no data is being sent
-The SIM card has data
-The SIM card is operational – I called it and heard the ring
-The led light is blinking twice per second
-Most importantly, I know the SIM card can send data since I have used code from this site and it worked: [Protected]
But when I try with the code on this site, no data is being sent
My feeling is that fields for “User” and “PWD” could be the issue.
I’m using an arduino mega with the SIM800L module. I would like to use your code since it looks to be faster than the one I have seen from the other site
Hi,
There must be a logical reason behind it, it worked for us flawlessly, I personally don’t think it is due to User and PWD. If such issue exist we will look into it.
Regards
Hello, Can You tell about the AT commands used for GSM SIM 800A to Read the data from Thingspeak and control relay ON/OFF.
Please guide with the problem.
Thank you
Please refer the datasheet of SIM 800. Controlling a relay via thingspeak is not that straight forward, in near future we will be updating an article.
Hi, great tutorial really easy to follow through. I followed the instructions precisely, I’m using GSM900, as mentioned in the tutorial if GSM is connected to the internet, the network status light should blink twice. That is not happening with mine but everything else is working just fine according to the serial monitor. How do I ensure a connection to the internet on my GSM 900?
Hi,
Did you place the correct APN in the code for your SIM card?
Regards
Hi,
I am getting to errors when I try to compile this code:
Error 1 : dht.h: No such file or directory. When I try to include the DHT library, this error shows at dht DHT : ‘dht’ does not name a type.
I also get an error ‘expected primary expression before ‘,’ token.
Please guide me on the issue.
Hi, You need to download the provided DHT library and add to your IDE.
Dear sir Good explanation.
But for me network connected , meaning that status is binging every three seconds, but not binging two times in a second, I connected with software serial port of the GSM, and the jumper i connected for software serial, I have given correct API key also given correct APN (Oman sim: Ooredoo), only two change I made it. no error showing
Please wait…..
Please wait…..
Please wait…..
OK, Humidity: 32.0%, Temperature: 25.0*C
OK, Humidity: 32.0%, Temperature: 25.0*C
OK, Humidity: 32.0%, Temperature: 25.0*C
OK, Humidity: 32.0%, Temperature: 25.0*C
OK, Humidity: 32.0%, Temperature: 25.0*C
OK, Humidity: 32.0%, Temperature: 25.0*C
OK, Humidity: 33.0%, Temperature: 24.0*C
OK, Humidity: 32.0%, Temperature: 25.0*C
OK, Humidity: 32.0%, Temperature: 25.0*C
OK, Humidity: 32.0%, Temperature: 25.0*C
OK, Humidity: 32.0%, Temperature: 25.0*C
OK, Humidity: 32.0%, Temperature: 25.0*C
OK, Humidity: 32.0%, Temperature: 25.0*C
OK, Humidity: 32.0%, Temperature: 25.0*C
OK, Humidity: 32.0%, Temperature: 25.0*C
OK, Humidity: 32.0%, Temperature: 25.0*C
OK, Humidity: 33.0%, Temperature: 24.0*C
OK, Humidity: 32.0%, Temperature: 25.0*C
OK, Humidity: 32.0%, Temperature: 25.0*C
OK, Humidity: 32.0%, Temperature: 25.0*C
OK, Humidity: 32.0%, Temperature: 25.0*C
OK, Humidity: 32.0%, Temperature: 25.0*C
OK, Humidity: 33.0%, Temperature: 25.0*C
OK, Humidity: 32.0%, Temperature: 25.0*C
OK, Humidity: 32.0%, Temperature: 25.0*C
OK, Humidity: 33.0%, Temperature: 25.0*C
OK, Humidity: 32.0%, Temperature: 25.0*C
OK, Humidity: 32.0%, Temperature: 25.0*C
OK, Humidity: 32.0%, Temperature: 25.0*C
OK, Humidity: 32.0%, Temperature: 25.0*C
Good!
Hello
Sir please how can to read data from Thingspeak to my Arduino using GSM
If possible we will try to do a project on this…
Hi sir I have a technical issue , I have a sim 900a gsm module and I am using airtel 4g sim for the first time it worked, from next time i powered the module the network light is glowing in red rather than green.
But after establishing a network it still blinks on red for every 3 sec
I am no able to send data to server
Hi,
It is difficult to debug without your actual setup with me, I recommend you to follow the troubleshooting methods mentioned in the post. Also please refer the instruction manual that came with your GSM module and what red light signify.
Regards
Hi, I am using antenova GSM Shield which connects on top of my Arduino Mega. I have left out digital pin 2 and jumpered it to pin 10 as told in this article https://www.arduino.cc/en/Guide/GSMShieldLeonardoMega.
I am using your code and made the rx tx to be pin 2,3.
I can see the temp and humidity on the serial monitor but its not being updated to thinkspeak. I have data in the sim and the led blinks every 2 seconds that shows its connected to the internet. Please help.
The AT commands of your shield and GSM 800 must be the same, only then it works, please check the AT commands on the data sheet and compare with the code.
Does your data sheet says blinking twice accessing data?
Hi!
Thanks for the code… i edit for my needs, but i only get field1 on Thingspeak!
Where is the problem?
This is my code [External Link Removed]
Thanks
Sorry,
I can only debug the code only if I have your whole circuit setup. Try to enter an integer value manually on the 2nd variable using quotation marks and see if you can get the value on Thingspeak.
Hi,
If I buy sim7020e module will this work too ? What do I need to change from the code since the sim7020e is nb-iot ?
Thanks
Hi,
As long as the AT commands for both the GSM modules are same (which I think yes), it will work.
Hi,how can I integrate a total of 3 sensors? For weight and humidity and temperatures? Thanks
Hi,
It is not possible to explain it in the comments in few words, try to understand the code and you will be able to modify.
Regards