
IoT Based Water Level Monitoring System
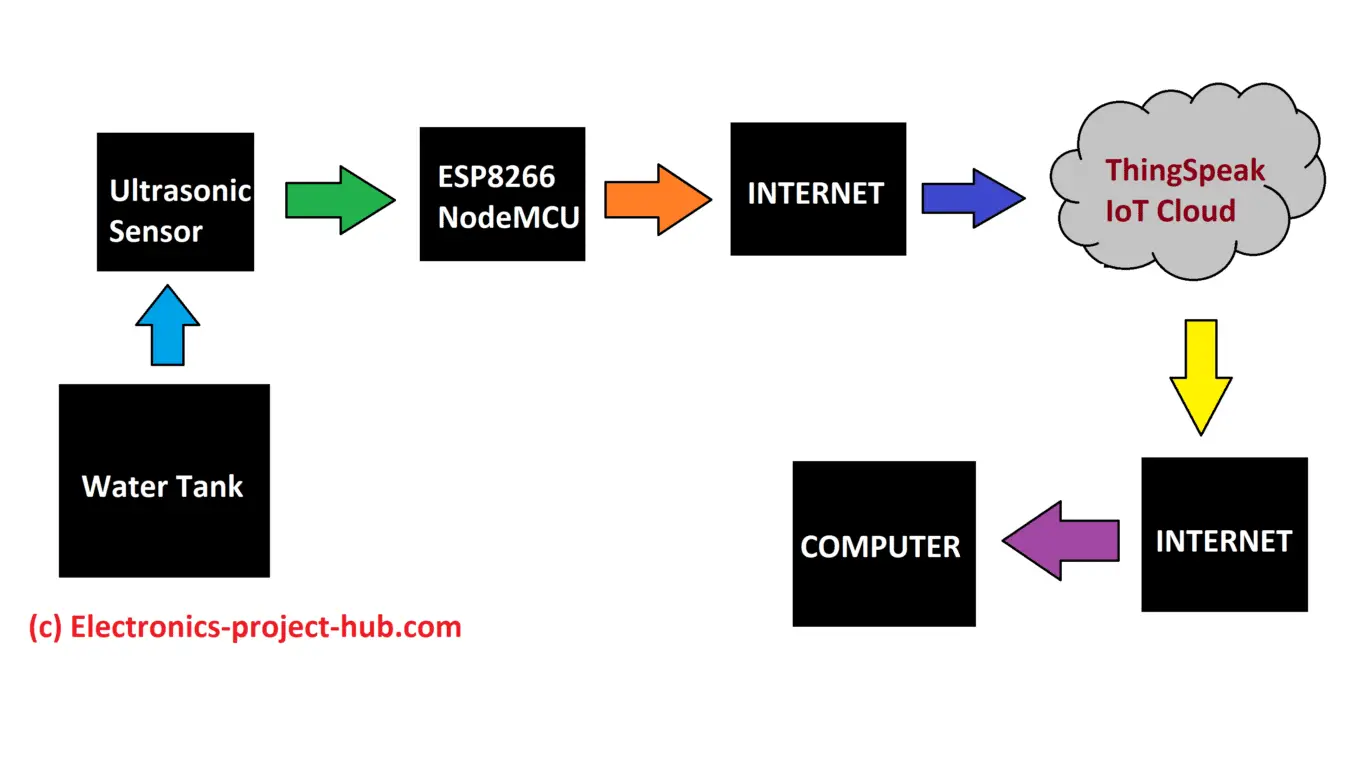
In this post we are going to build a water level monitoring system which can log water level data of an overhead or an underground tank to an IoT cloud called Thingspeak where we can monitor the current level of water and consumption overtime. In a previous water level monitoring system project we used GSM module (SMS) and ultrasonic sensor to render water level of a tank, here we are using IoT and the same ultrasonic technology to measure water level precisely.
We will see:
- Why should we use IoT for monitoring water level?
- How to measure water level using ultrasonic?
- Setting up your Thingspeak account.
- Circuit diagram.
- Program code for IoT based water level monitor.
- Prototype and demonstration.
Why should we use IoT for monitoring water level?
Due to exploitation of water resources and speeding of climate change due to human activities, water becoming a luxury these days and keeping tab on water consumption is a necessity now. We know that water conservation starts from a family and a person in a family can easily track their water consumption either by observing day to day activities or checking water level of their overhead tank every day.
But for a municipal government who is concerned about the areas they governing cannot track each and every family’s water consumption by physically sending a person every day. Instead they can check level of municipal supply tanks where the level of water is direct reflection of water consumed by the people in the area. Again we have to deploy several people to take readings of tens of municipal overhead tanks several times a day.
It is a human nature to get inert sometimes or many times and one could manipulate the readings and could push the idea of water consumption of an area in wrong direction and this could also delay the water supply because the actual water level could vary significantly from the manipulated readings which could lead to unexpected shutdown of water supply.
By installing IoT based water level monitoring systems in all the important municipal water tanks the local government can know the level of water in real time and they can fill the tank on time and also can understand the consumption of water in the area. The collected data can be sent to higher level governments where they can draw national level conclusions on water consumption.
IoT based water level monitoring system can also be installed on individual houses / apartments so that one can check water level of their tank in real time from their own comfort and also track their consumption overtime.
Now you know why we are sending tank’s water level data over internet.
How to measure water level using ultrasonic sensor, and why?
In the previous water level indicator project we used an ultrasonic distance sensor to measure water level, here we are also going to use the same non-contact method because of its convenience and accuracy in reading water level.
When we decide to make any water level indicator project the first thing that comes to our mind is the electrodes that are we are going immerse in the water. Traditionally several metallic electrode are immersed in the water at different levels and some voltage is passed. The problem with this method in a long run is that, no matter how the electrodes were refined before installing, it will get corroded due to electrochemical reaction due to passing of electric current through water which reacts with some minerals present in the water and it is a bad idea to consume such contaminated water.
The resolution of the reading is limited to how many electrodes immersed in the water. The ultrasonic based measurement overcomes all the disadvantages that arise due to utilizing traditional electrode method. The accuracy of readings is +/- 3mm and can be used to tanks that are up to 4 meter deep.
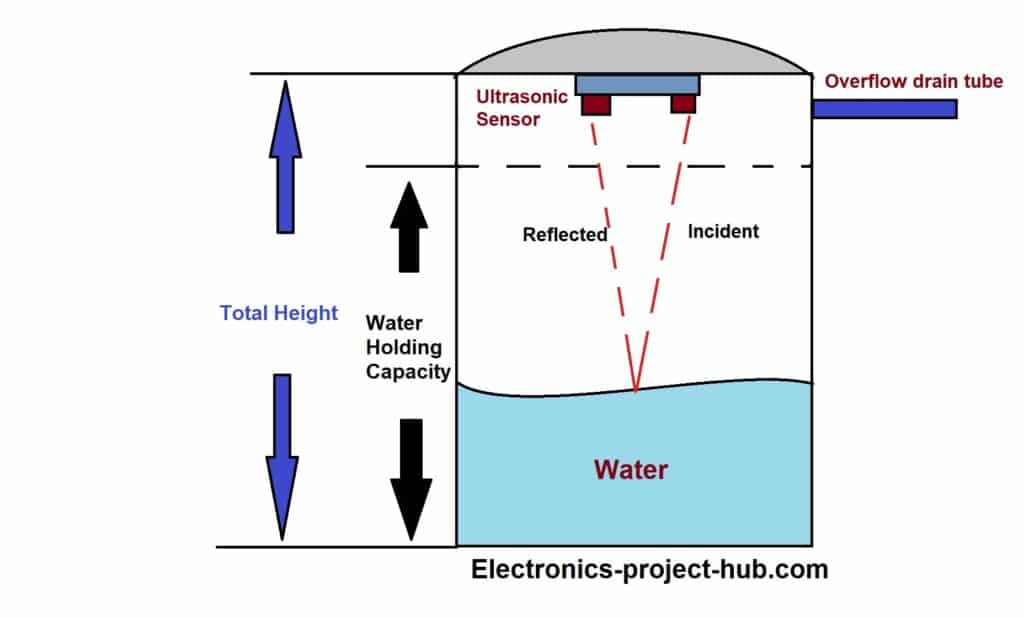
Measuring water level is same as measuring distance of solid surfaces, the ultrasonic transducer outputs a train of ultrasonic bursts at 40 KHz which will hit the water surface and reflect back to the sensor. The time taken between sent and received ultrasonic waves are calculated by a microcontroller such as Arduino. The measured distance is converted in to percentage.
The tank has two heights the actual water holding capacity and the total height of the tank. In any overhead tank there will be overflow and inlet tube, the point just below the overflow tube is the end of water holding capacity. You need to measure these two heights and enter it in the given program code in centimetre.
Setting up Thingspeak account to receive water level of a tank:
- You need to sign up for Thingspeak, if you haven’t done yet.
- Click on “New channel” and do the following.
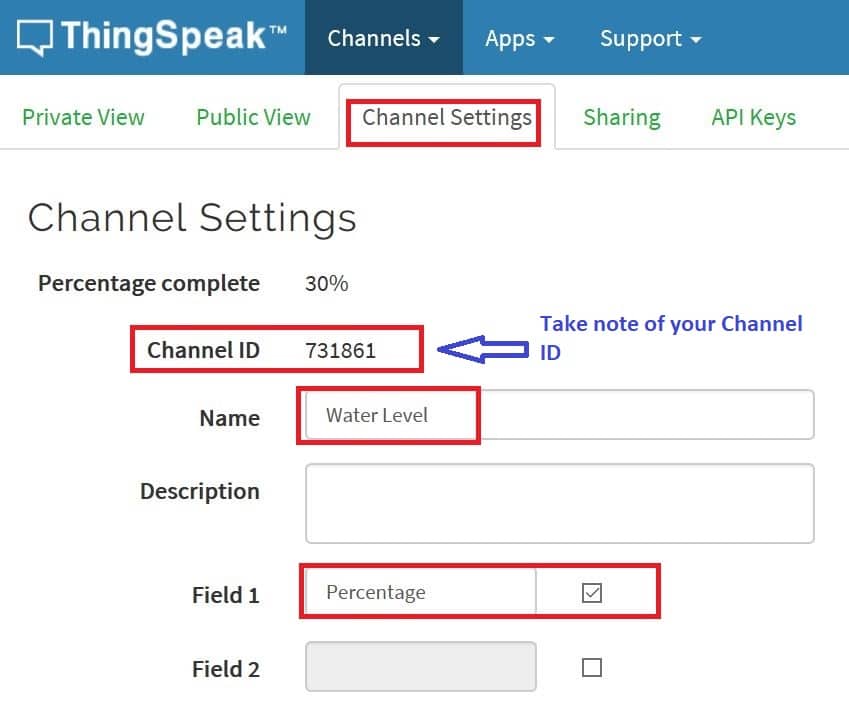
- Go to channel settings and change the name as “water level” and tick field 1 and name it as “percentage”. Note down your channel ID.
- Scroll down and click save.
- Now click on API keys tab and take note of your “write API key” which must be inserted in the given program code.
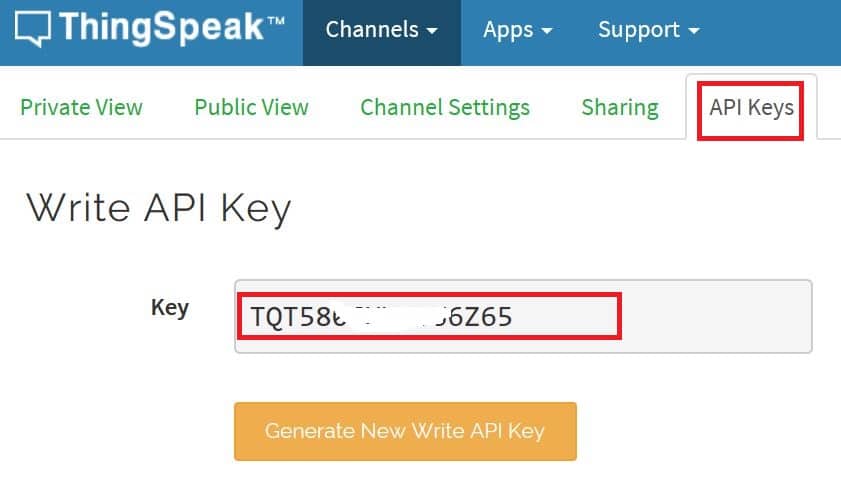
Now your Thingspeak account is ready to receive water level of a tank.
Circuit diagram:
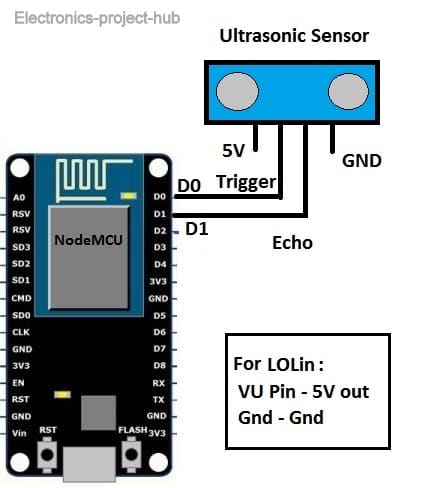
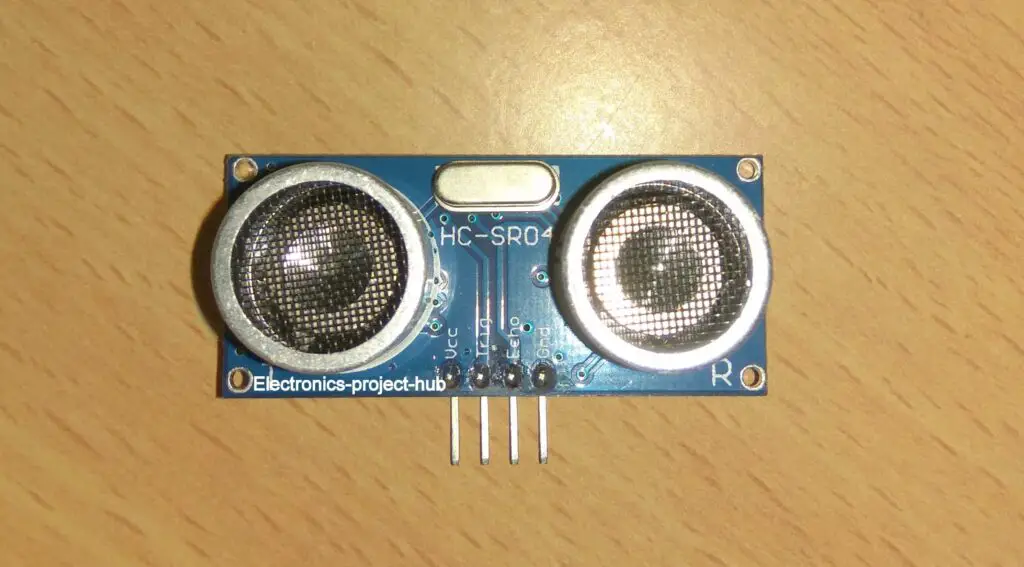
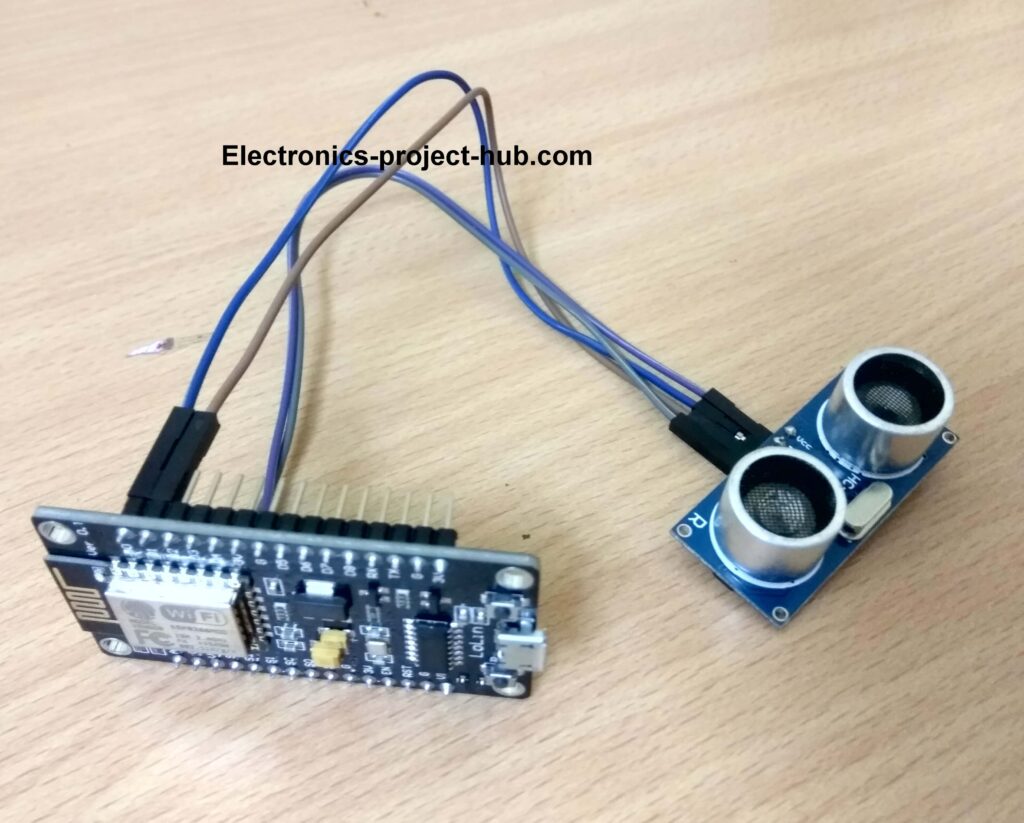
The circuit is hilariously simple we just have two components: HC-SR04 ultrasonic sensor and ESP8266 NodeMCU. The Trigger pin of ultrasonic sensor is connected to D0 and echo pin is connected to D1. The ultrasonic sensor requires 5V supply which can be obtained from VU pin (for LOLin ).
Download and install Thingspeak library to IDE: Click here
Note: You should have installed ESP8266 board package to Arduino IDE before you compile the code.
Program code:
#include "ThingSpeak.h"
#include <ESP8266WiFi.h>

//----------- Enter you Wi-Fi Details---------//
char ssid[] = "XXXXXX"; //SSID
char pass[] = "YYYYYY"; // Password
//-------------------------------------------//

// --------------- Tank details --------------//
const int total_height = 30; // Tank height in CM
const int hold_height = 25;// Water hold height in CM
//-------------------------------------------//

//----- minutes -----//
int minute = 1; // Data update in min.
//------------------//

//----------- Channel Details -------------//
unsigned long Channel_ID = 12345; // Channel ID
const int Field_number = 1; // To which field to write data (don't change)
const char * WriteAPIKey = "ACBCDEFGHI"; // Your write API Key
// ----------------------------------------//

const int trigger = 16;
const int echo = 5;
long Time;
int x;
int i;
int distanceCM;
int resultCM;
int tnk_lvl = 0;
int sensr_to_wtr = 0;
WiFiClient  client;


void setup()
{
  Serial.begin(115200);
  pinMode(trigger, OUTPUT);
  pinMode(echo, INPUT);
  WiFi.mode(WIFI_STA);
  ThingSpeak.begin(client);
  sensr_to_wtr = total_height - hold_height;
}
void loop()
{
  internet();
  for (i = 0; i < minute; i++)
  {
    Serial.println("System Standby....");
    Serial.print(i);
    Serial.println(" Minutes elapsed.");
    delay(20000);
    delay(20000);
    delay(20000);
  }
  measure();
  Serial.print("Tank Level:");
  Serial.print(tnk_lvl);
  Serial.println("%");
  upload();
}
void upload()
{
  internet();
  x = ThingSpeak.writeField(Channel_ID, Field_number, tnk_lvl, WriteAPIKey);
  if (x == 200)Serial.println("Data Updated.");
  if (x != 200)
  {
    Serial.println("Data upload failed, retrying....");
    delay(15000);
    upload();
  }
}

void measure()
{
  delay(100);
  digitalWrite(trigger, HIGH);
  delayMicroseconds(10);
  digitalWrite(trigger, LOW);
  Time = pulseIn(echo, HIGH);
  distanceCM = Time * 0.034;
  resultCM = distanceCM / 2;

  tnk_lvl = map(resultCM, sensr_to_wtr, total_height, 100, 0);
  if (tnk_lvl > 100) tnk_lvl = 100;
  if (tnk_lvl < 0) tnk_lvl = 0;
}

void internet()
{
  if (WiFi.status() != WL_CONNECTED)
  {
    Serial.print("Attempting to connect to SSID: ");
    Serial.println(ssid);
    while (WiFi.status() != WL_CONNECTED)
    {
      WiFi.begin(ssid, pass);
      Serial.print(".");
      delay(5000);
    }
    Serial.println("\nConnected.");
  }
}
You need to do the following changes to the code:
- Insert you Wi-Fi credentials here:
//----------- Enter you Wi-Fi Details---------//
char ssid[] = "XXXXXX"; //SSID
char pass[] = "YYYYYY"; // Password
//-------------------------------------------//
- You need to enter water tank heights here:
// --------------- Tank details --------------//
const int total_height = 30; // Tank height in CM
const int hold_height = 25;// Water hold height in CM
//-------------------------------------------//
You have to measure your tank’s total height and water holding capacity height and enter it here in centimeter.
- You need to enter how frequent your tank level needs to be updated to Thingspeak:
//----- minutes -----//
int minute = 1; // Data update in min.
//------------------//
Note: Minimum is 1 min. If you want to send data every hour enter 60, if you want to send data once every day set 1440 (24hrs = 1440 min) and so on.
- You need to enter your channel details here:
//----------- Channel Details -------------//
unsigned long Channel_ID = 12345; // Your Channel ID
const int Field_number = 1; // To which field to write data (don't change)
const char * WriteAPIKey = "ACBCDEFGHI"; // Your write API Key
// ----------------------------------------//
How to Upload Code to NodeMCU:
- Connect your NodeMCU using micro USB cable to your PC.
- Press and hold flash button and press the reset button once and now you leave the flash button.
- Select the NodeMCU v1.0 as board.
- Select 115200 as baud rate and select the correct COM port.
- Press upload button, it may take 2 min to compile the code and another one minute to upload to NodeMCU.
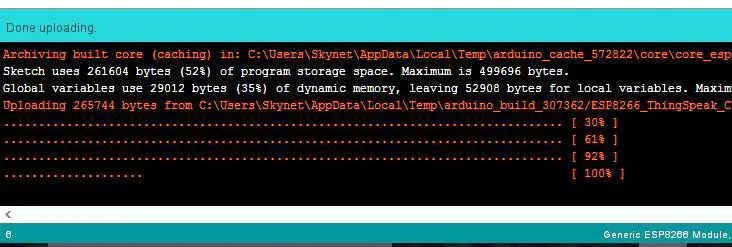
On successful program uploaded to NodeMCU, you will see this:
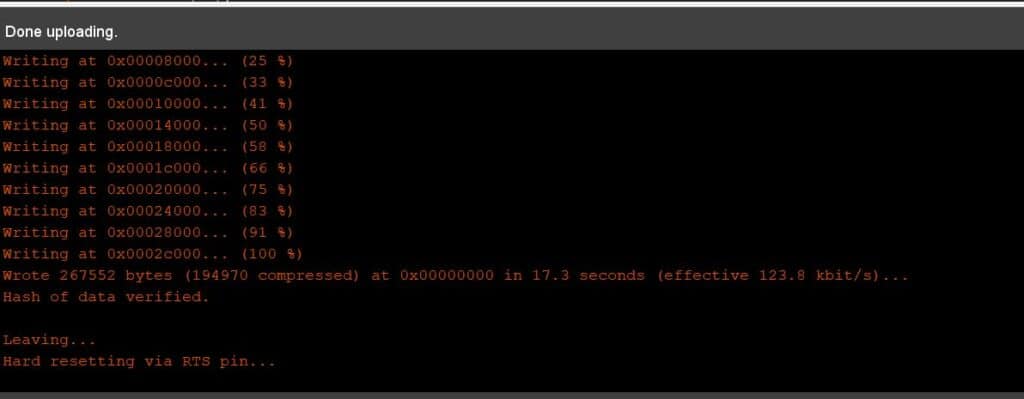
Or you will see this if you installed ESP32 package to Arduino IDE before:
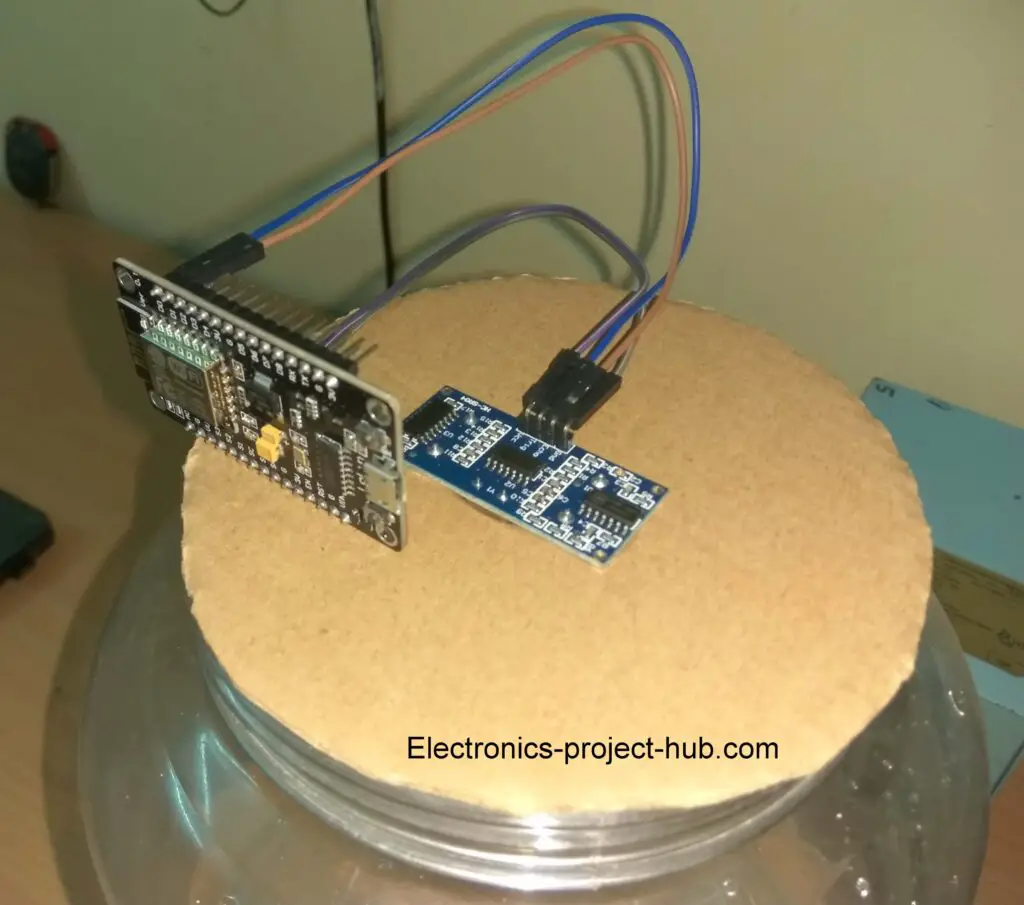
Demonstration:
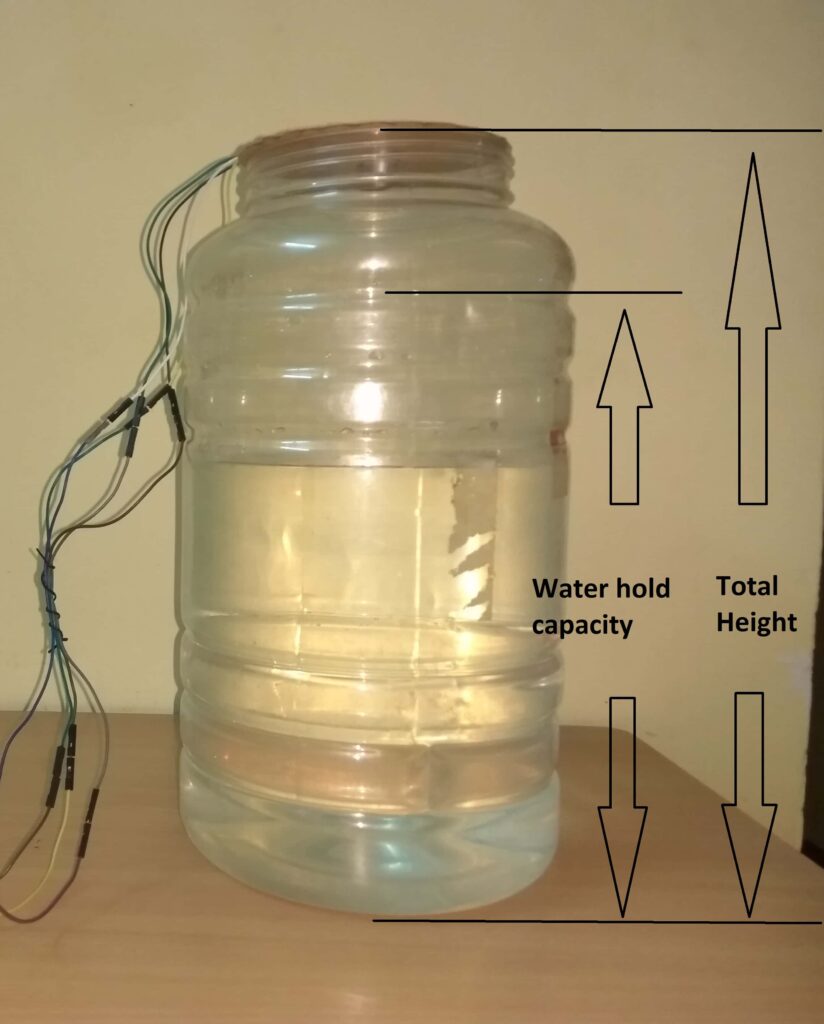
For demonstration purpose I am going to use a mini water tank that measures 30 cm in (total) height and since it doesn’t have overflow tube, I have marked water holding height as 25 cm as shown below:
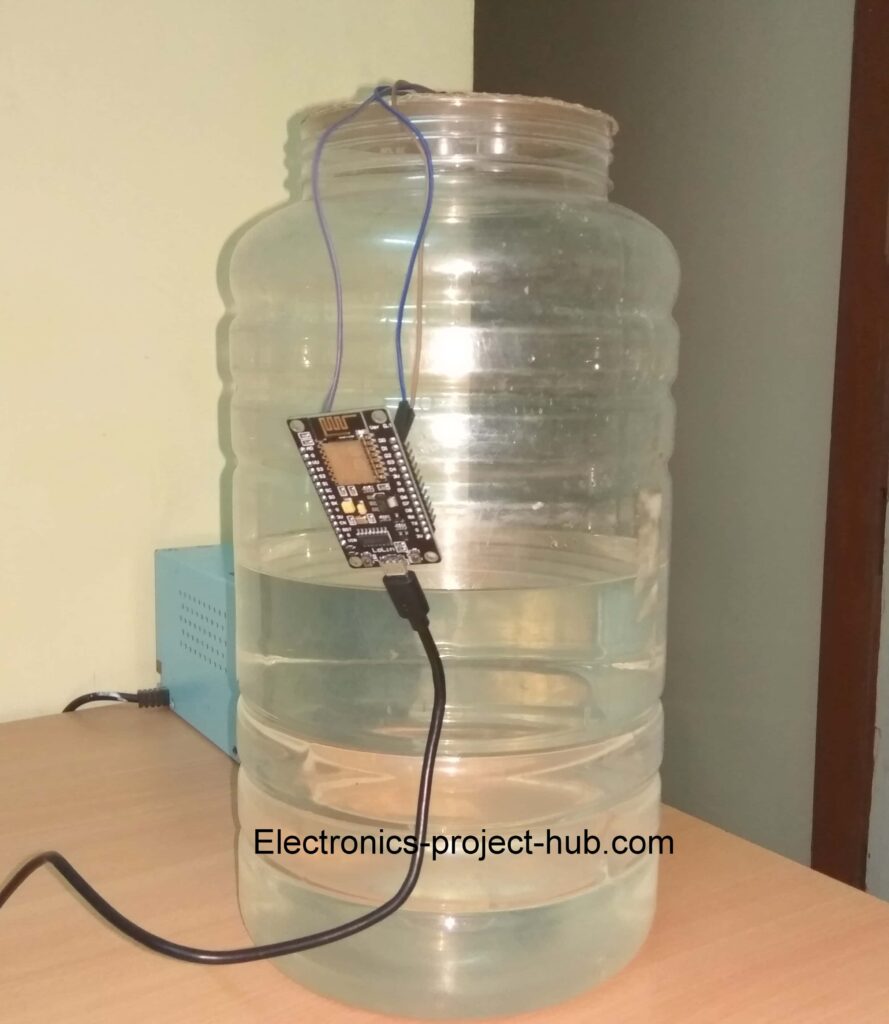
After entering the necessary detail in the code I uploaded the code to NodeMCU. I have set the code to update data every 1 minute.
Data on Thingspeak:
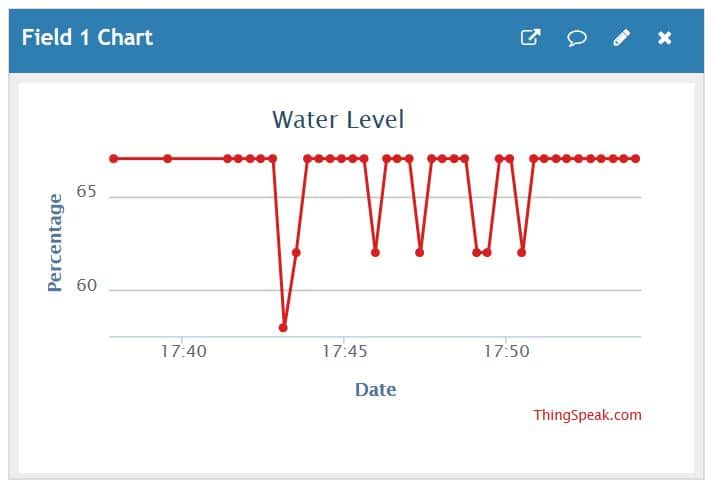
During the test I drained some water and added some water at times, that’s why water level on graph moves up and down.
On Serial Monitor:
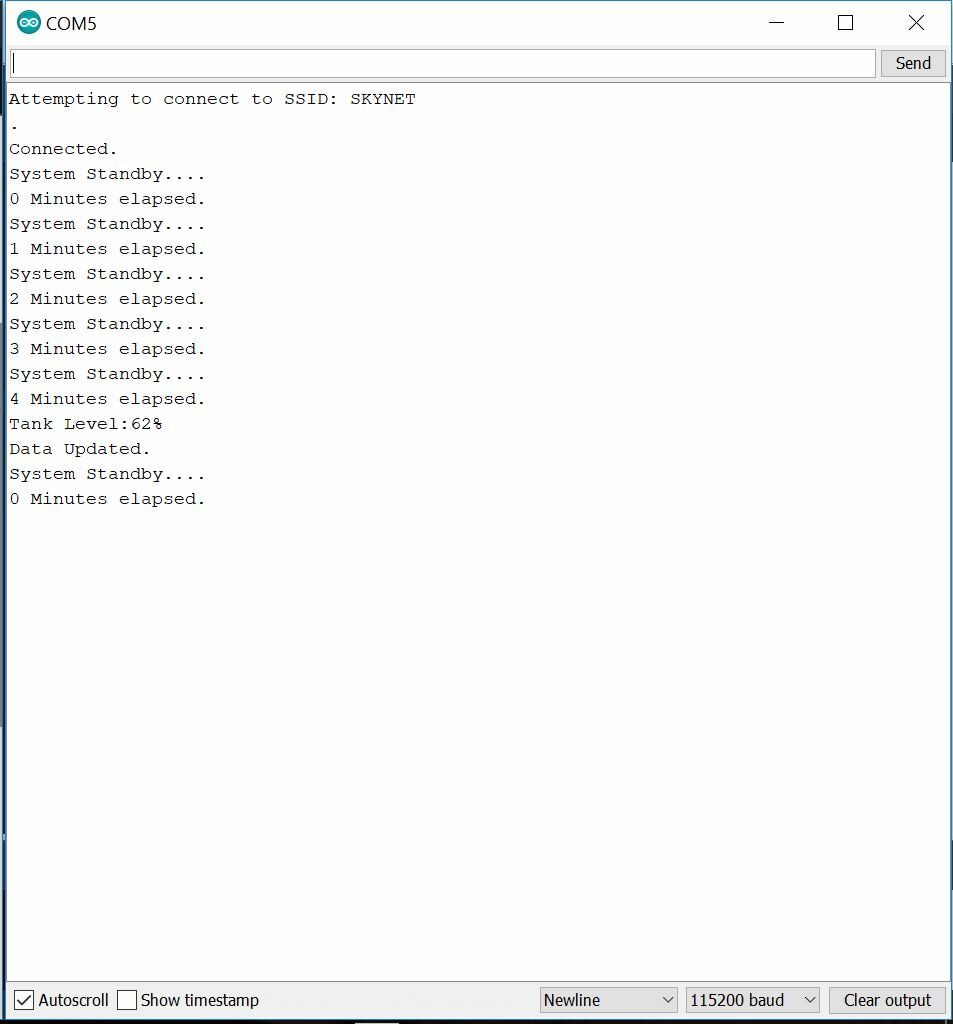
You can also open serial monitor with baud rate of 115200 to see what’s going on with NodeMCU.
Also see: GSM Based Water Level Monitoring System
If you have any question regarding this project feel free to ask us in the comment, you will get a guaranteed reply from us.
Blogthor
My nick name is blogthor, I am a professional electronics engineer specialized in Embedded System. I am a experienced programmer and electronics hardware developer. I am the founder of this website, I am also a hobbyist, DIYer and a constant learner. I love to solve your technical queries via comment section.


i want to know how to see the output on thinkspeak
You need to log in to your Thingspeak account and click private view.
Can I push my data to my website ? If yes then how kindly suggest me.
Hi,
You mean reading data from Thingspeak and displaying to your website?
Regards
Hii sir….. I want to check the water level of a tank (1000Litre)…….then what changes comes in process…. Please tell me
Hi,
No changes, just measure the tank correctly and enter it in the code.
Regards
can u expalin the code
Can we import data of Thingspeak to Blynk or MIT App Inventor
Yes it is possible, but we haven’t tried this yet, you may get help from a Android or iOS developer.
I have written the code but tank lavel always show the same percentage. I don’t know what mistake I have made. Can you please explain why I am getting the same level. Can you give your e- mail id, I will send the photos of my code.
Hi,
You can upload the text file to your google drive and share the link here. Can you please tell us what modification has been done or trying to do? so that we can help you out..
Regards
Hello,can we make this for overhead tank for 10 floor building? if yes …
How to increase range of esp8266 nodemcu?
1) Can we make this for overhead tank for 10 floor building? – YES, if the tank is less than 4 meter deep.
2) How to increase range of esp8266 nodemcu? – You are suppose to increase the range (coverage) of your wi-fi network by using wi-fi repeater, not the other way around.
Regards
This Project works great. I am thinking of using JSN SR04T(Waterproof Ultrasonic Sensor) because of Humid environment inside the water tank.
Great! I am glad it worked. JSN SR04T is a good idea.
Is it possible to receive the data in another esp8266 connected with same network with graphical manner in LCD ? If possible kindly mail me the code pls
Hi,
Yes, it could be possible and if it is possible we may post a project in future.
Regards
Hi,
I have a question: quoting below sentence from your post:
“the ultrasonic transducer outputs a train of ultrasonic bursts at 40 KHz which will hit the water surface and reflect back to the sensor. ”
Now I am confused here, will the ultrasonic burst reflect after hitting the water surface? or it will travel through the water and hit the solid surface of the tank and then reflect back to the receiver….
I may be wrong, please correct me if I am.. I am trying to build this for my home but reading is always 100% even if the water level is 30-50%
Thanks.
Sadi
Hi,
It will hit the water surface and reflect back and some get absorbed by the water. It won’t hit the solid surface and reflect back as you mentioned.
You have to enter the exact measurement to the code to get the correct water level percentage.
Regards
Hi There,
I have deployed the setup for my overhead tank. It is working perfectly.
Thanks and keep posting home automation projects for us!
Regards
Great! Good job 🙂
sir, the port disables when the esp8266 is connected through USB cable. but the led flashes while connecting the esp8266 and it also flashes while pressing reset button. but the port disabled. what should i do to overcome this? hope u will concern this and clarifies this doubt.
Are you talking about the COM port?
sir i rectified that error sir.but tank level shows same 100%.here i posted the code sir.please clarify this doubt sir
Hi,
There should be some issue with your sensor, have you ever tested your ultrasonic sensor outside this project? And did you apply 5V to the ultrasonic sensor correctly.
Regards
Guys plzz Check the codes. On code DO,& D1 is not even mentioned on then how trig & echo is connected ??
They have given trig = 16
Echo =5
This is worng. Trig =Do
Echo =D1
Hi,
I think you are new to NodeMCU. If you are using Arduino IDE to program a NodeMCU ESP8266, then pin numbers on NodeMCU cannot be directly used on Arduino code. The equivalent Arduino pin for D0 is 16 similarly for D1 is 5. Please Google “NodeMCU Arduino pins” everything will clear to you.
Regards
sir,
1) where should we enter the code ? in arduino or some other ?
2) Where the o/p will display?
3)can you explain what is in serial monitor and why it shows after 5 minutes the tank percentage?
4)Note: You should have installed ESP8266 board package to Arduino IDE before you compile the code.
How to do it sir?
Hi,
1) The code should be entered in Arduino IDE.
2) The output is displayed at a couple of places: At serial monitor and Thingspeak.
3) The serial monitor is only for debugging purpose at the time of building the circuit. It shows whether your ESP8266 connected to WI-FI or not, whether the data is updated to Thinkspeak or not. The serial monitor shows tank level and says data has been updated because, when I was prototyping this circuit I set the update frequency to Thingspeak was 5 mins.
4) You can following this article and scroll to the section “How to install ESP8266 package to Arduino IDE”.
Regards
sir, thank you for clearing all my doubts. But again i strucked.
The output shows same 100%! What mistake i did sir? even i entered values correctly.
coming to sensor , my sensor is 3V….should i connect it to 5V battery?
Thanks in advance:)
Hi,
Can you please tell me which sensor you are referring to?
1) sir,what is the power supply required for nodemcu whether it is 5V or 3.3V
2) If suppose 5V how will we connect and for 3.3V how will we connect in real time situations.
3)whether we need to connect a battery or some other alternative for 3.3V and 5V
1) 5V
2) The ultrasonic sensor works at 5V. If you want to use 3.3V for some reason there is an 3.3V output pin on NodeMCU.
3) You can use power bank to power the circuit or 5V DC adapter.
if (x == 200)Serial.println(“Data Updated.”);
in this line, 200 represents what?
if 200 represent level sensor value which is updated in senior monitor means every minute, is it updates the same 200?
please explain
Thanks in advance
Hi,
200 is a HTTP response code, if we receive 200 as a response, the data has been uploaded correctly to Thingspeak.
you mentioned the two screenshot of upload to nodemcu. when uploading, i got like second (i.e or else) screenshot. what should i do to rectify this problem ?. Thanks in advance
Can you please tell us what problem are you facing exactly. Your question isn’t clear….
How to do it with ESP32? What changes in code and connections have to be made?
Change the pins number correctly by referring ESP32’s Arduino pin.
I have a question can you please tell me how can we use both the nodemcu and gsm in this project because my fyp requires both the things and for thingspace can we upload it to a website…..
water level always shows 100% i’m not getting output correctly can you help me.
Hi, Please check the wiring associated with the sensor, check the pins.
hello sir. We’re doing the same project for our thesis, but the difference is we are using Blynk IOT and we have data analytics. What information requirements should we gather and what features should we put in order for us to come up to a good result? is your code applicable to ours?BTW, we are using esp32 ..
Hi,
The code is applicable only for Thingspeak and ESP8266, however you can use it for ESP32 by configuring the pins properly and we haven’t tried with Blynk.