
How to Connect Multiple LCD to Arduino: Regular & I2C
In this post we are going to learn how to connect multiple 16×2 LCD display to Arduino using regular method where we connect lots of wires and also using I2C adapter where we connect just 4 wires.
We will see:
- How to connect multiple LCDs to Arduino using regular method.
- Circuit diagram.
- Example code.
- How to connect multiple LCDs to Arduino using I2C adapter.
- How to change address of I2C adapter module.
- Example code for multiple I2C displays.
You are here because your project uses two or more 16×2 / 16×4 LCD displays to showcase different readings / information etc. and you are scratching your head how to accomplish this, if so you landed on the right place. First let’s see how connect multiple LCDs using regular method where we connect a tons of wires to LCD.
How to Connect Multiple LCDs WITHOUT I2C – Regular method:
Circuit diagram:
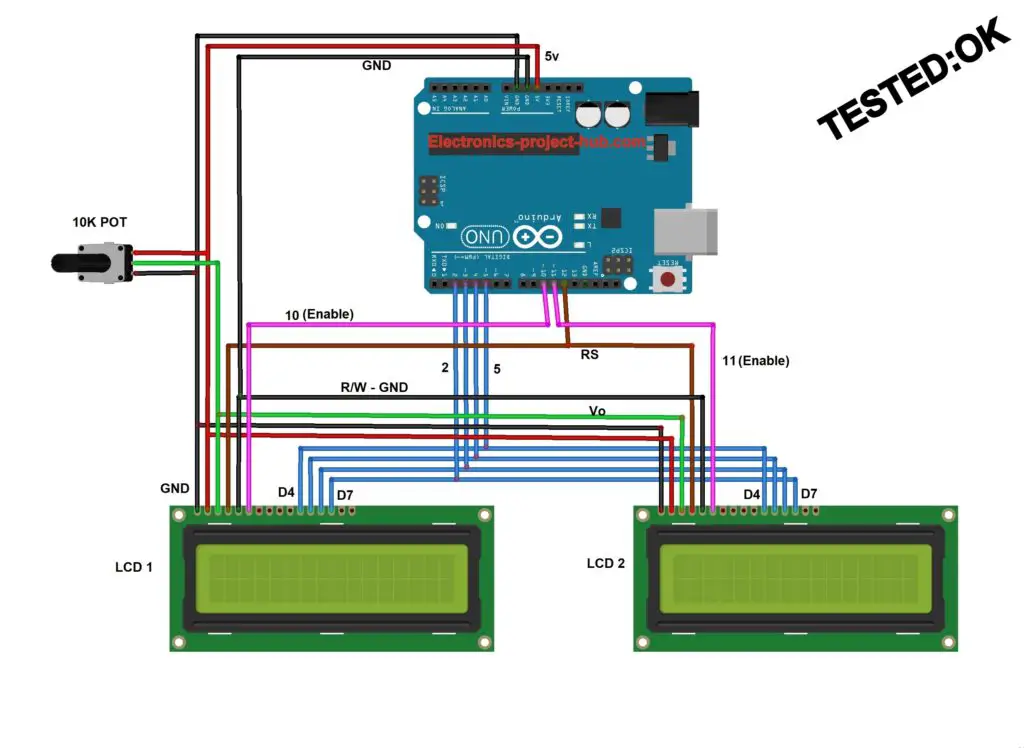
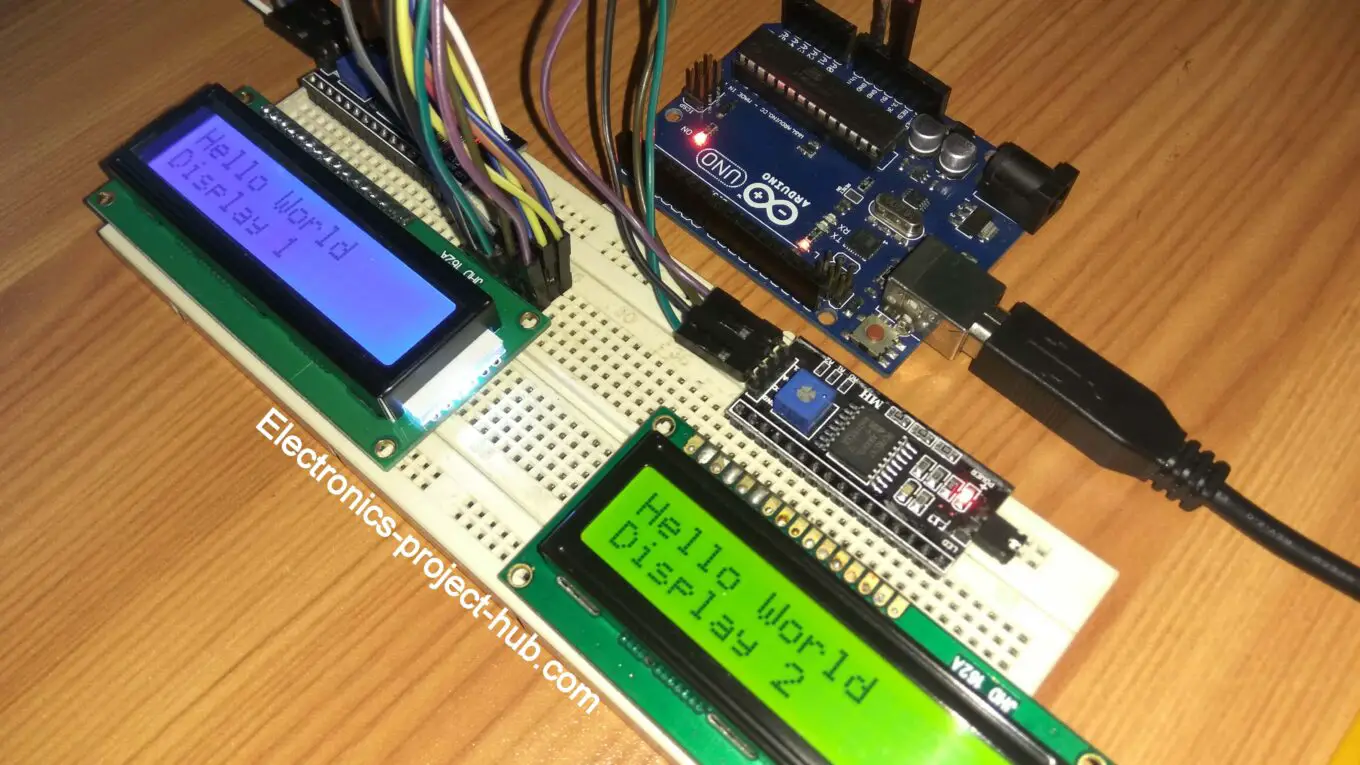
As an example we are going to connect two 16×2 LCD displays and these two LCDs operate independently. Connecting multiple LCDs to Arduino are easier than you might think.
The pins: Vcc, GND, Vo, RS, R/W, D4, D5, D6 and D7 are connected in parallel with second LCD. The only pin that must connect independently is EN – enable pin, EN pin helps Arduino to pass data on the intended LCD.
A single 10K potentiometer is used for adjusting contrast of multiple LCDs simultaneously; this is achieved by connecting all the Vo (contrast adj.) pins of all LCDs in parallel with the potentiometer.
How many LCDs Can I connect to Arduino?
The limit for number of LCD depends on how many spare GPIO pins left for EN pins after connecting all other peripherals like sensors, buttons etc. If your Arduino have 5 spare GPIO pins left, you can connect 5 LCDs. If your Arduino Mega left with 20 spare GPIO pins for EN you can connect 20 LCDs which can operate independently.
Now let’s see how to code for multiple LCDs for Arduino.
Example Code:
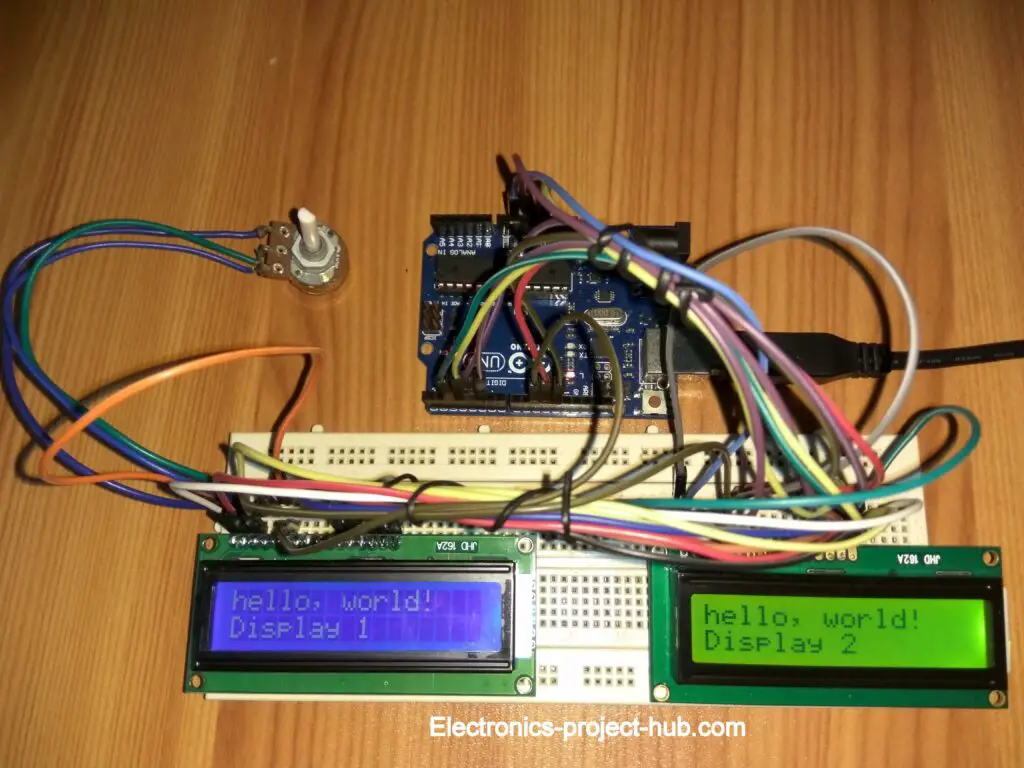
// ------ ©Electronics Project Hub -------//
#include <LiquidCrystal.h>
const int en1 = 10;
const int en2 = 11;
LiquidCrystal lcd1(12, en1, 5, 4, 3, 2);
LiquidCrystal lcd2(12, en2, 5, 4, 3, 2);

void setup()
{
  lcd1.begin(16, 2);
  lcd2.begin(16, 2);

  lcd1.print("hello, world!");
  lcd1.setCursor(0, 1);
  lcd1.print("Display 1");


  lcd2.print("hello, world!");
  lcd2.setCursor(0, 1);
  lcd2.print("Display 2");
}

void loop()
{

}
// ------ ©Electronics Project Hub -------//
The above code is just an example how to use two LCDs which can operate independently, you need to add your project’s main functions and if you wish you can also add more LCDs.
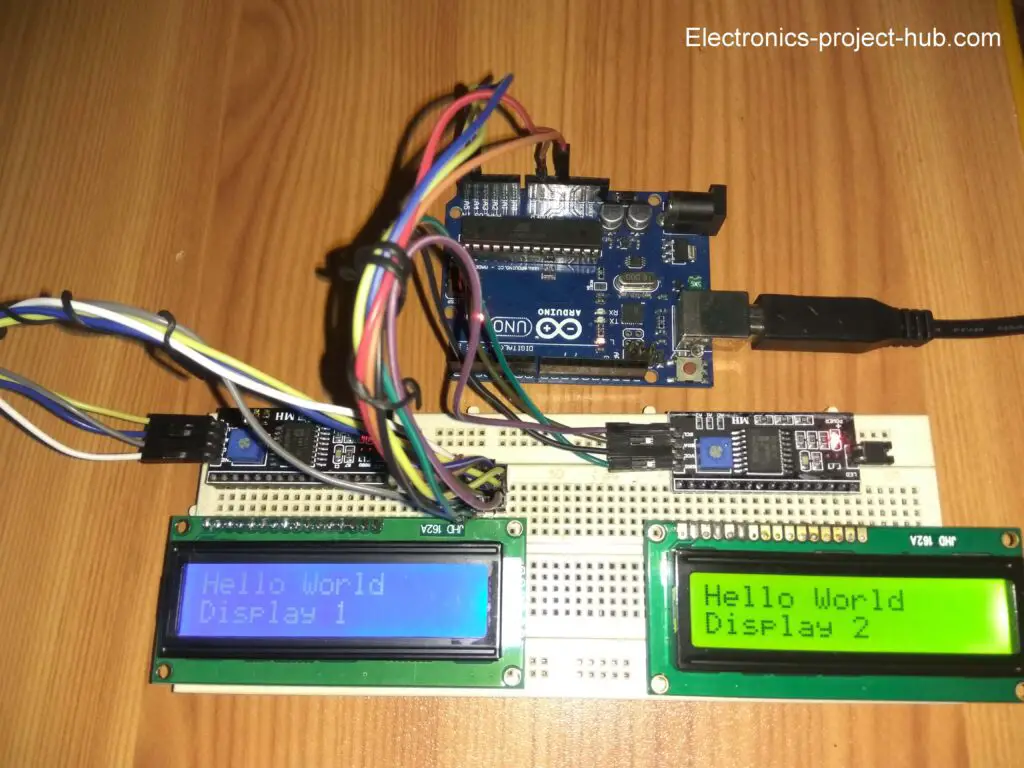
Prototype:
How to connect multiple LCD to Arduino using I2C display adapter:
At this point I no need to explain what is I2C LCD adapter module because you already know how to use one and you are here to explore how to use two or more independently and simultaneously.
The problem arises when there is need for a second display and if we wire-up a second display with SCL and SDA bus, we will end up duplicating the display and don’t operate independently.
This is because two of the I2C modules have identical addresses, if you want to operate them independently we need to change address of any one of the two I2C adapter’s address.
How to Change Address of I2C Adapter module?
Fortunately, we can easily change the address of I2C display modules; this is accomplished by bridging two contact points provided on the I2C module with solder.
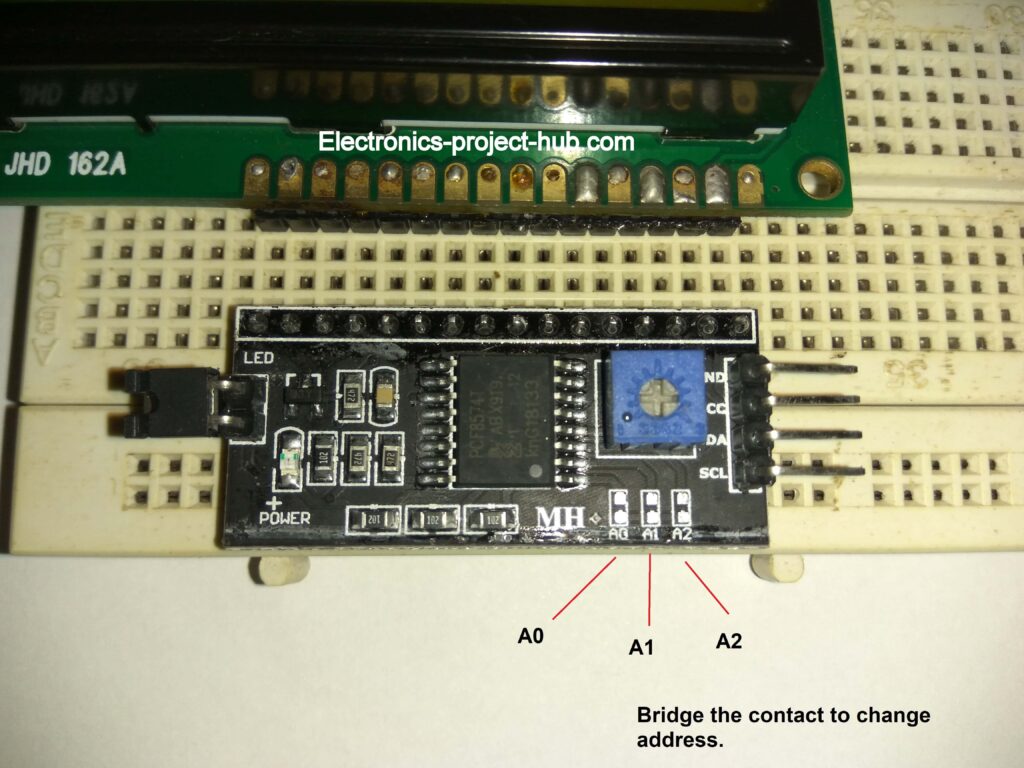
Here A0, A1 and A2 has nothing to do with analog inputs or outputs, here A stands for address, you can find contact points on several other I2C modules and sensor which has the capability to change address.
By default the address of this module without any bridged contact is “0x27”. By bridging any one or any two or all three will result in change in address.
- By bridging the contacts A0, A1 and A2 individually you will get 3 sets of address.
- By bridging any two contacts at a time: A0 and A1 or A0 and A2 or A1 and A2 will generate another set of 3 addresses.
- By bridging all three contacts will generate one new address and without bridging any contact will generate one address which is default “0x27”.
Now that’s total of 8 different addresses.
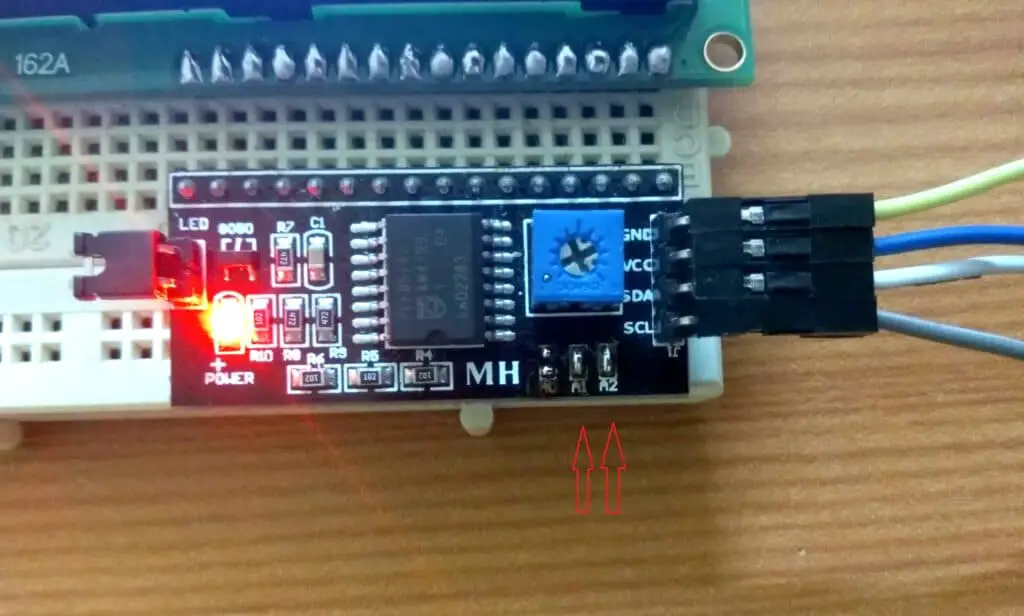
Here I bridged A1 and A2; this gave me an address “0x21”. All I need to do is just insert the address in the program code.
How you should NOT bridge the contact:
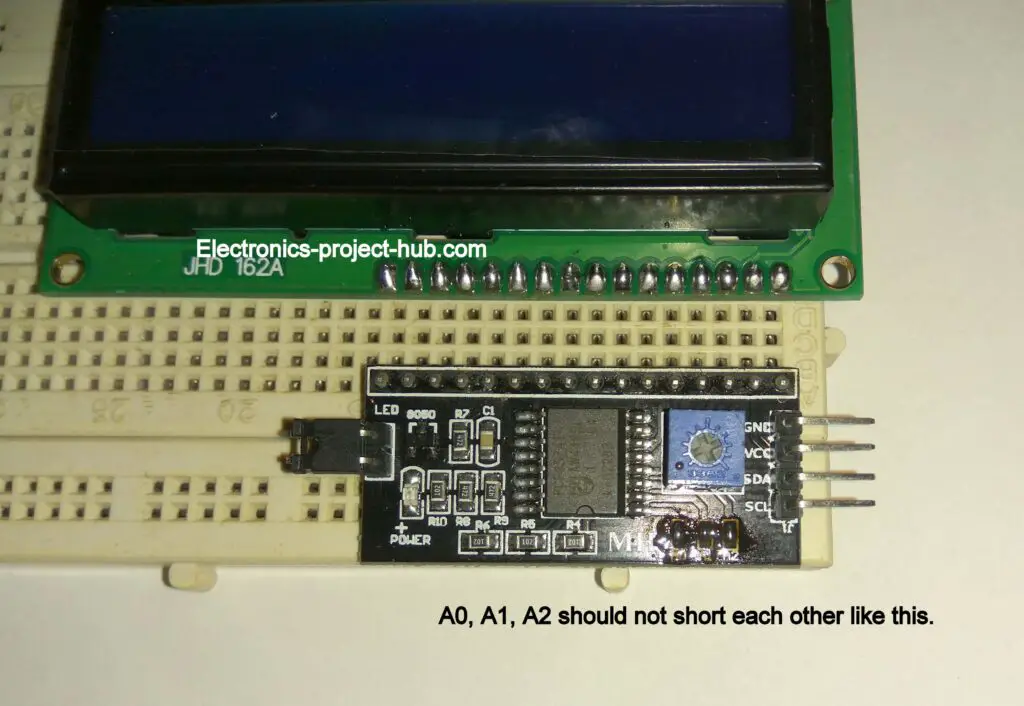
The A0 or A1 or A2 should not touch each other.
Circuit diagram:

- The LCD 1’s address is default “0x27”.
- The LCD 2’s I2C address is “0x21” by bridging A1 and A2.
The circuit is self-explanatory; just connect all the I2C wires in parallel.
Download I2C library here: github link
I am using the above mentioned library, but you can use any other library.
Example code:
// ------- ©Electronics Project Hub -----------//
#include <Wire.h>
#include <LiquidCrystal_I2C.h>
LiquidCrystal_I2C lcd1(0x27, 16, 2); // << Address 1
LiquidCrystal_I2C lcd2(0x21, 16, 2); // << Address 2

void setup()
{
  lcd1.init();
  lcd2.init();

  lcd1.backlight();
  lcd2.backlight();

  lcd1.setCursor(0, 0);
  lcd1.print("Hello World");
  lcd1.setCursor(0, 1);
  lcd1.print("Display 1");

  lcd2.setCursor(0, 0);
  lcd2.print("Hello World");
  lcd2.setCursor(0, 1);
  lcd2.print("Display 2");

}


void loop()
{
}
// ------- ©Electronics Project Hub -----------//
Output:
How to find the address of my I2C adapter?
Now we know that by bridging the given contacts we will get different addresses, but how to know the current address of your I2C adapter? Well, we have made a program which should to be uploaded to Arduino with an I2C module attached on Arduino’s I2C bus and powered ON.
The code will show you the address and the number of connected I2C devices on serial monitor.
Program code I2C scanner:
// ---- ©Electronics Project Hub-------- //
#include <Wire.h>
void setup()
{
  Wire.begin();
  Serial.begin(9600);
  while (!Serial);
  Serial.println("-----------------------");
  Serial.println("I2C Device Scanner");
  Serial.println("-----------------------");
  byte error;
  byte address;
  int Devices;
  Serial.println("Scanning...");
  delay(1000);
   Serial.println("--------------------------------");
  Devices = 0;
  for (address = 1; address < 127; address++ )
  {
    Wire.beginTransmission(address);
    error = Wire.endTransmission();
    if (error == 0)
    {
      Serial.print("I2C device found at address 0x");
      if (address < 16)
      {
        Serial.print("0");
      }
      Serial.print(address, HEX);
      Serial.println("  !");
      Devices++;
    }
    else if (error == 4)
    {
      Serial.print("Unknown error at address 0x");
      if (address < 16)
        Serial.print("0");
      Serial.println(address, HEX);
    }
  }
  if (Devices == 0)
  {
    Serial.println("No I2C devices found\n");
  }
  else
  {
    Serial.println("-------------- Done!!! -------------");
  }
}
void loop()
{

}
// ----© Electronics Project Hub-------- //
Address of I2C devices:
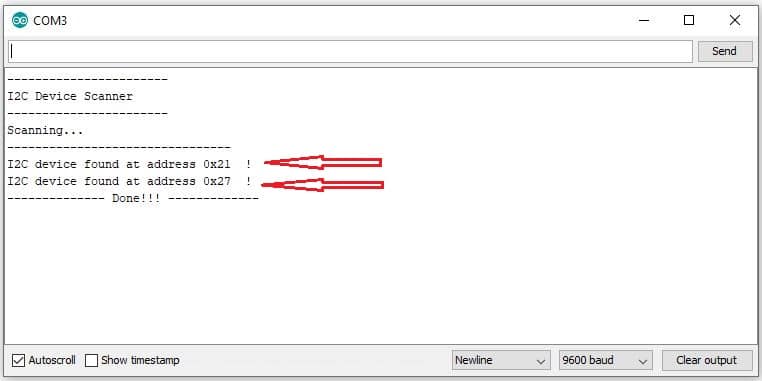
You can insert the address shown in your main project code.
How many I2C display can I connect?
You can connect 8 LCDs (max) using I2C adapter. I2C bus can support up to 127 devices but we can only change address from 0x27 to 0x20 – 8 addresses. Rest of the address are reserved for other I2C sensors and peripherals.
Now you know how to interface multiple LCDs on Arduino using conventional and I2C method.
If you have any questions regarding this tutorial, feel free to ask us in the comment. You will get a guaranteed reply from us.
Blogthor
My nick name is blogthor, I am a professional electronics engineer specialized in Embedded System. I am a experienced programmer and electronics hardware developer. I am the founder of this website, I am also a hobbyist, DIYer and a constant learner. I love to solve your technical queries via comment section.


Nice article.
Thanks…
Hope you enjoyed and found your solution.
Hi…I like to connect 20 LCDs to Arduino is it possible??
Thanks in advance
It might be possible only using standard method but your Arduino need enough spare pins for connecting 20 LCDs. Using I2C is not possible as there are only 8 address reserved for LCD adapter.
I believe that there is an error in the diagram for the I2C connections. The text states “just connect all the I2C wires in parallel” but that is not what the diagram shows. In the diagram, one of the brown wires is labeled “A4-SDA” and the other is labeled “A5-SCL”. In other words, an SDA from one LCD module is connected to the SCL connection from the other module. The same holds frue for the blue connection in the diagram.
Hi Hannes,
Thank you very much for pointing the error in the circuit, it will be fixed soon.
Regards
It has been fixed now….
Other way round?
I have 3 Arduino boards sharing the same LCD 2004 over I2C.
What about two different LCD like a 1692 and the other a 2004?
Great article. Nicely done.
Thanks
Hi,
You can try LCD 1692 and 2004 together, I believe it can work well.
Not sure about 3 Arduino and one LCD, need to do more research about it.
Regards
When i compile this is the error message I receive
exit status 1
‘int LiquidCrystal_I2C::init()’ is private within this context
Nowhere in the Arduino reference do i find “init”
Hi,
Please install the LCD I2C library (from the highlighted link) to your Arduino IDE.
Regards
hi,
can i obtain the address of I2C using the given code while it is connected to my lcd??
also can i change the address of a oled I2C using the method??
Hi,
1) Yes!
2) If your OLED display have similar pads that can be bridged, then Yes!
Regards
Neat!
Is it possible to use a standard lcd and a I2C lcd with the same Arduino board. I want to do this as a demo to compare how both LCDs display.
Yes, you can… that’s what I shown in the post.