12V 100Ah Battery Charger Circuit
In this post we are going to construct simple 12V 100Ah lead acid battery charger circuit which can deliver 10A of current. We have proposed 3 different charger circuits; you may construct one that suits you. To make the project construction easy, the components are available as modules.
We will see:
- How 100Ah / 150Ah / 200Ah Lead Acid batteries are charged properly.
- 24V 10A SMPS Overview.
- 100Ah Battery Charger Using MOSFET.
- 100Ah Battery Charger Using LM7815.
- 100Ah Battery Charger Using Buck converters.
How to charge a 100Ah / 150Ah / 200Ah battery properly?
It is very important to know how charging of high capacity lead-acid batteries are done, before you dive into the construction details of chargers. Proper understanding will help you to determine at what voltage, at what current the battery need to be charged and when to cut-off from the charger, so that your battery will be charged optimally and have less chance of premature expiration or lose in capacity.
Lead-acid batteries are charged in three stages:
1) Constant current.
2) Constant voltage.
3) Trickle charging.
Let’s look at the charging characteristics graph of a lead acid battery:
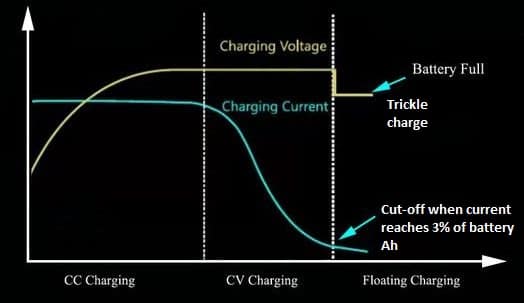
Constant current charging:
A 12V battery is generally charged at 14.4V or 2.40V per cell. When we connect the charger to the battery, voltage dips from 14.4V to a voltage level where the battery is discharged and slowly rise, meanwhile the current drawn from the charger will be maxed out (the maximum current that is limited by the charger).
The maximum current draw will continue until the voltage of the charger reaches around 14.4V (pre-set voltage). In the graph we can see a straight blue line represents the current and this line is constant with time. This part of charging process is called constant current charging. 70% of the battery is charged during CC stage.
Constant voltage charging:
The yellow line in the graph represents the battery voltage which rises during charging. At a point (14.4V) after which the voltage is constant with time, meanwhile the current starts to drop rapidly. This stage is called constant voltage charging. Remaining 30% of the battery is charged in this stage.
Note: Transition from constant current to constant voltage stage occurs naturally.
Trickle charging:
Trickle charging is done by applying current equal to self-discharge rate of battery. It is done at no load.
When to disconnect the battery from charger?
The battery need to be completely cut-off from charger or it should be trickle charged at low current when the charging current reaches 3% of the battery capacity (Ah).
For example, a 100Ah battery need to be cut-off when charging current reduced to 3A. A 200Ah battery need to be cut-off when charging current reaches 6A. Charging beyond this could damage the battery.
NOTE: By measuring voltage alone will not tell us whether the battery is fully charged or not. It is the current that indicates the state of charge.
How to determine charging current for lead-acid battery?
Charging current for any lead acid battery must be as per manufacturer’s recommendation. However charging the battery less than specified current will not harm the battery but it will take longer to attain full charge.
Charging current for lead acid batteries can be from 10% to 25% of the capacity. If you are not sure at what current the battery needs to be charged, you can confidently apply charging current of 10% of battery capacity. Charging the battery at 10% of battery capacity is recommended by many battery manufacturers.
For example: If you have 100Ah battery you can charge it at 10A. If you have 200Ah battery you can charge at 20A.
You may use this formula: Charging current = 0.1 x Ah.
How long it will take to charge a battery?
Assuming the battery is discharged (not over discharged) you can apply this formula:
Hours = Charging current / Ah
For example:
- Hours = 10A / 100Ah = 10 hour.
- Hours = 15A / 150Ah = 10 hour.
You should always measure the current to determine whether the battery is fully charged or not.
Now you know, at what current and voltage the battery need to be charged for any capacity of lead-acid battery, you know when to cut-off the battery from the charger and you also have a crude idea how long it takes to charge a battery completely.
24V 10A SMPS Specifications / Mains Voltage Step down:
The first thing that comes to our mind while planning to construct such charger is how can I get high current step-down transformer like 10A or 15A which is not only very difficult to find one, but also very expensive.
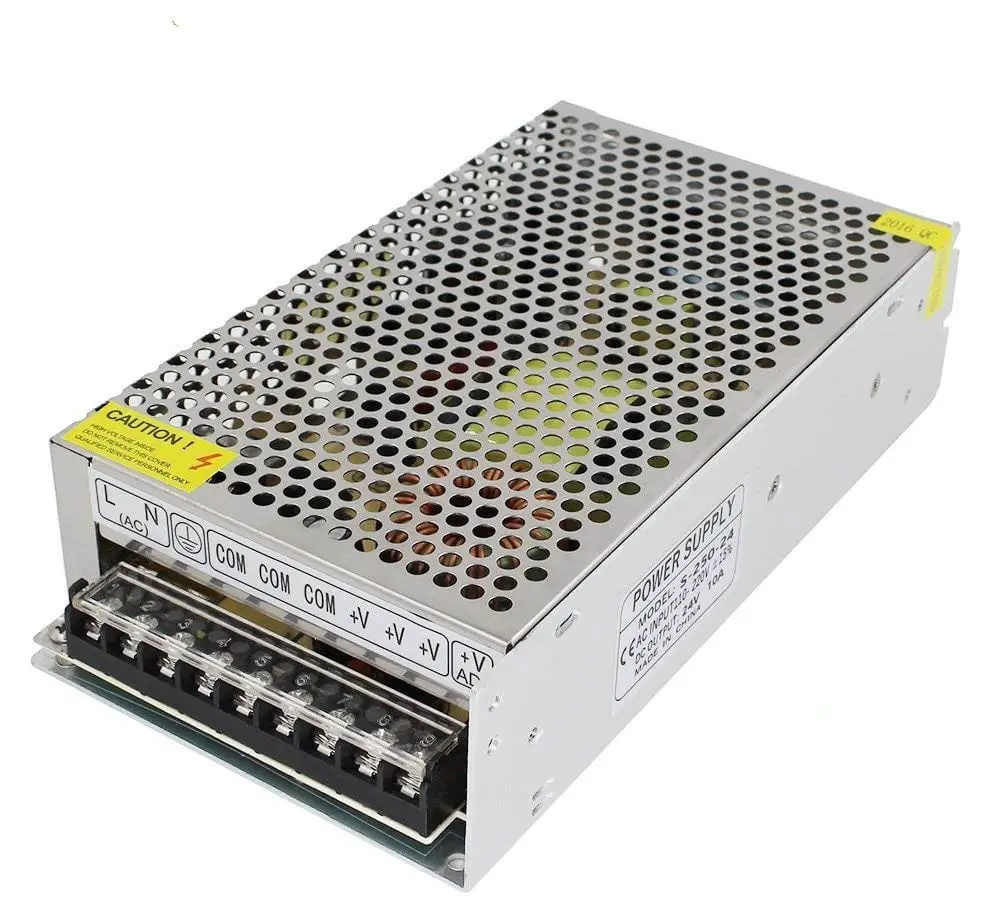
Fortunately, we no need to find a 10A transformer; we can get a 24V 10A SMPS from online and offline markets, which is very efficient and loaded with protection features and less expensive than a traditional transformer and weighs less.
We are going to use the 24V 10A SMPS as power supply for all three proposed 100Ah charger designs.
24V 10A SMPS illustration:
Terminals of 24V, 10A SMPS:
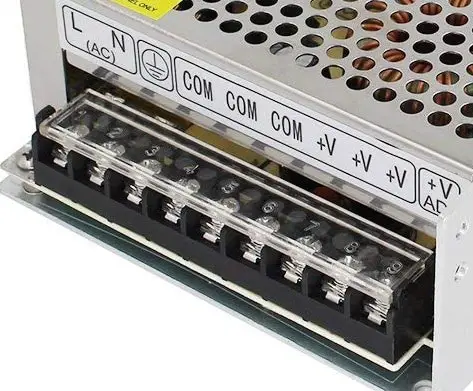
It has 9 terminals, out of which 3 are Mains (Live, Neutral and Earth). There are 3 GND (COM) and 3 +Ve terminals which are all same. The output of this SMPS has short circuit protection.
At the right most side there is a pre-set resistor (+V ADJ) which got hidden in the image. It is used for varying voltage from 21.4V to 28V. In this project we need to keep the pre-set to the lowest position to minimize the heat generated in the all 3 charger circuit designs.
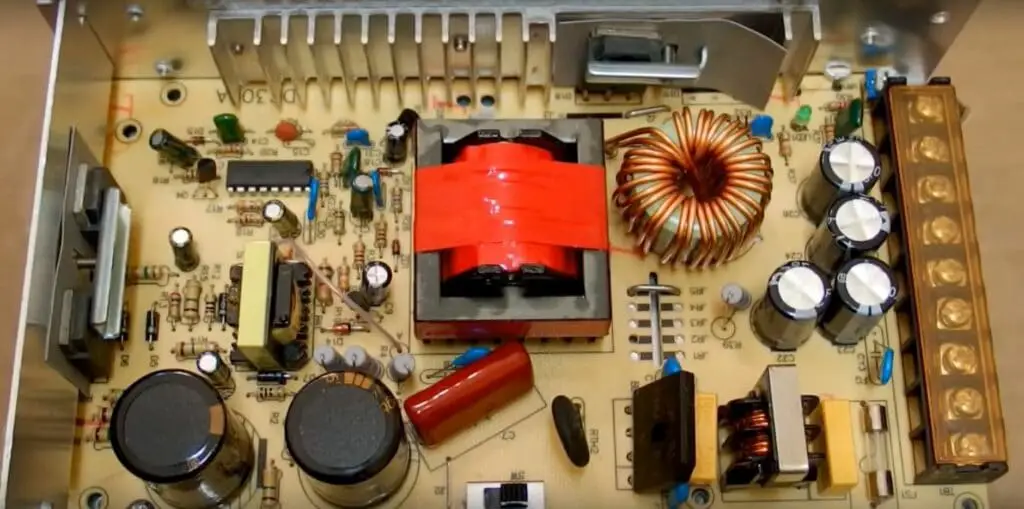
Here is the internal circuitry for those who are curious, what is inside this 24V, 10A SMPS. From our testing it delivered 10A of current at 24V without any voltage drop or overheating.
Note: You should not charge a battery with capacity less than 50Ah with all three proposed circuits.
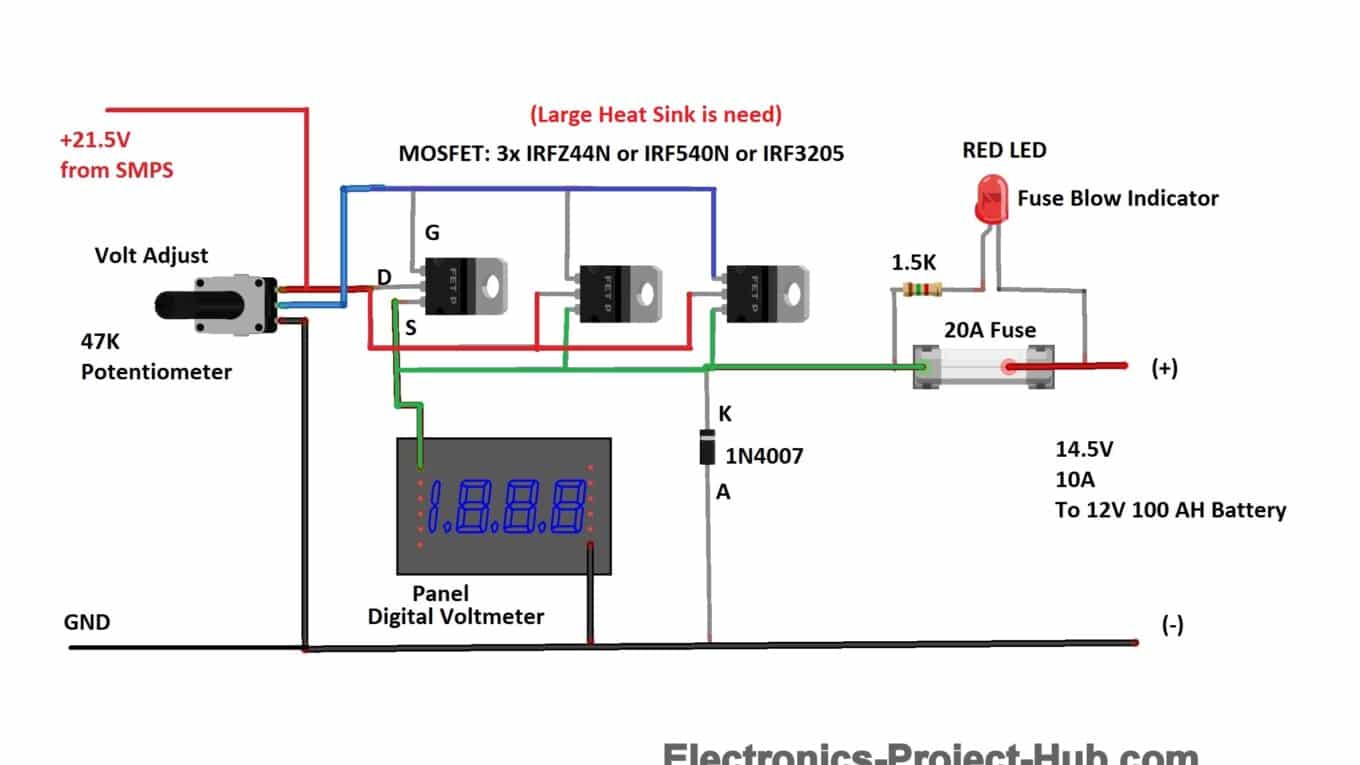
12V 100Ah Battery Charger Circuit Using MOSFET:
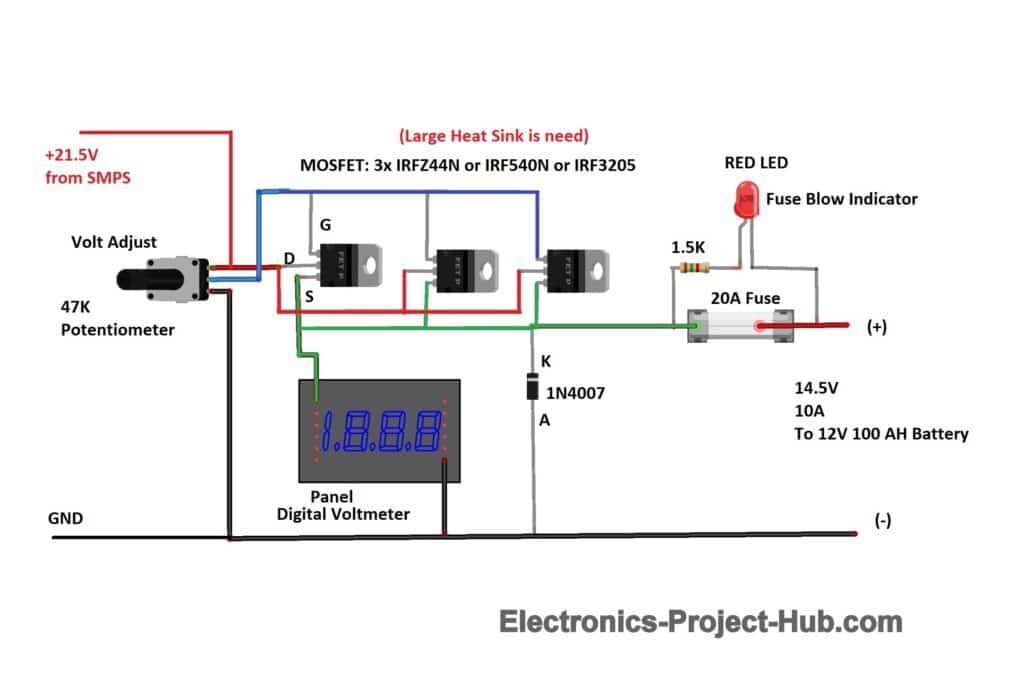
Note: The cathode (-) of LED must be connect to +Ve of the output, for fuse blow indication.
Circuit Description:
The purpose of this circuit is to step down 21.5V from the SMPS to 14.5V which can be used for charging a 100Ah battery.
The circuit very simple just consists of three MOSFETs connected in parallel and configured as common drain / source follower, a variable resistor is provided to adjust the output voltage (to 14.5V). A battery reverse protection is implemented using a diode and a 20A fuse. A fuse blow indicator is also provided to indicate fault in the circuit. A digital voltmeter is connected permanently at output to monitor the battery voltage while charging.
Since the MOSFETs are operated at linear mode, three MOSFETs are connected in parallel to reduce heat dissipated by individual MOSFET, which will reduce the chance of thermal runaway. Large heat sink must be screwed to each MOSFET individually with thermal paste.
How this circuit works?
The MOSFETs are configured as source follower / common drain which is also known as buffer amplifier. The character of such amplifier is that, it has very high current gain and unity voltage gain, meaning the output voltage will be same as input, but it can provide lot of current at output.
The input voltage is applied at gate terminal using a potential divider (47K variable resistor) and output is taken from source terminal. In MOSFETs ideally no current passes through the gate terminal and input voltage will be same as output, but practically few micro-amps to milliamps of current flows through gate and there will be voltage drop of one volt between input and output.
Safety Feature:
Reverse battery / short circuit protection is very important for a battery size of 7Ah and above. The short circuit current will be so high that even connected wires can glow red and probably can burn down your house or workshop if something went wrong. You should NOT neglect the important safety feature in any of the given designs.
A simple and effective short circuit protection can be achieved by using a diode and a fuse. When the battery is connected in right polarity the diode will be reverse biased and this will not make the fuse blow.
When the battery polarity is reversed the diode will be forward biased and short circuit will be made (before the main circuit) to blow the fuse instantly, preventing further damage or short circuit.
Since we have connected a LED with current a limiting resistor in parallel with fuse, when fuse blows the current will pass thought the LED and light up, indicating the fuse has blown.
How to charge a battery using this charger circuit:
- Turn ON the circuit, no battery must be connected initially.
- Check the voltmeter and adjust the voltage if necessary (to 14.5V).
- Use a pair of alligator clips that can handle 20A and connect to battery terminals in correct polarity.
- Once the voltage reaches 14.4V – 14.5V, be ready with a clamp meter to measure current.
- Once the current reach close to 3A (for 100Ah), you can disconnect from the charger.
- Once you got a rough idea how long it takes to charge, you can use a socket timer to automate the cut-off.
12V 100Ah Battery Charger Using 7815:
In this design, you no need to regulate or set the voltage, the circuit will output a fixed 14.3V to 14.4V.
Circuit Diagram:
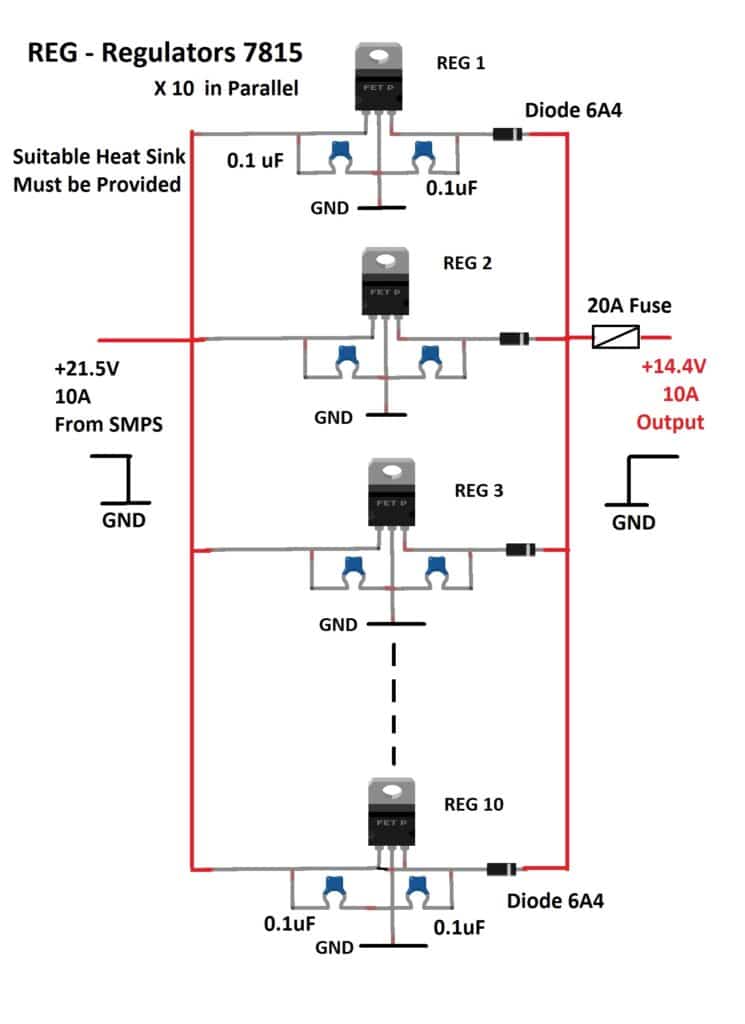
NOTE: Connect a digital voltmeter at the output permanently before fuse, which is not shown in the circuit.
Circuit Description:
The circuit consists of 10 normal LM7815 15V, 1.5A voltage regulators connected in parallel and the outputs are isolated using 6A4 diodes. 0.1uF capacitors are connected at each IC’s input and output; this will stabilize the regulator’s output voltage.
The diode serves two purposes:
1) To reduce 15V to 14.3V (15V – 0.7 = 14.3V) which a suitable voltage for charging while 15V is not.
2) To isolate each ICs output.
Isolating the outputs are very important than you might think. LM7815 has some tolerance value in the output voltage, say 14.95V to 15.05V. One IC will output 15.05V while some other IC will try to maintain 14.95V, this could start an oscillation and may introduce ripple in the supply which is not appreciated.
Diodes at each output will prevent such unexpected oscillations and ripple, thus gives a clean DC supply for charging.
Safety Features:
- The output is reverse polarity protected obviously since we have 10 diodes at each regulator.
- A 20A fuse is installed at the output; this is because you can still unintentionally short circuit the battery when your charger is powered ON and connecting the battery in reverse.
- Thermal protection exists in each regulator. Say if one of the regulator got very hot it will automatically shut down, meanwhile rest of the 9 ICs will keep functioning. Once the overheated IC cools down it starts to regulate.
How to use this charger properly?
- Turn on the charger with no battery connected initially.
- Check the voltmeter, it should read 14.3V or 14.4V.
- Connect the battery in correct polarity.
- Remove the battery from charger when the current reaches 3% of the battery capacity. Check the current using a clamp meter.
- Use a socket timer to automate the cut-off process after getting a rough idea how long it takes to charge the battery.
Panel Voltmeter:
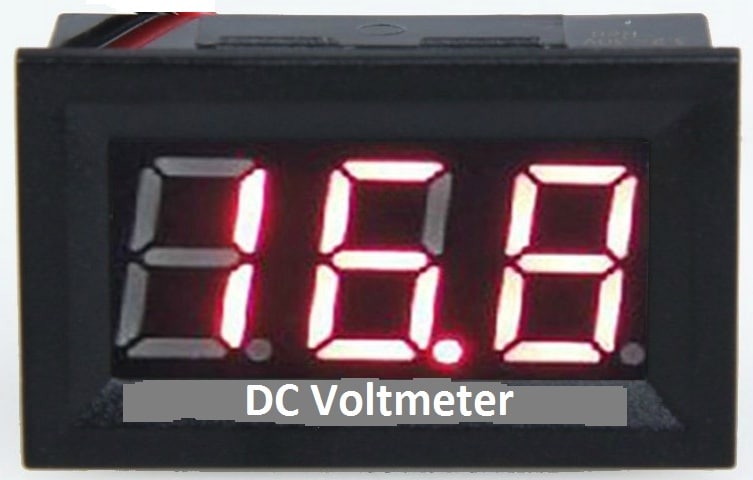
Get a voltmeter something similar as shown below, it doesn’t need a battery. Attach it to your charger permanently. Don’t use a meter with ammeter function. These cheap meters cannot handle 10A for several hours. You can connect a 15A to 20A analog ammeter in series with the output, if you don’t want to use a clamp meter to measure charging current.
12V 100Ah Battery Charger Using Buck Converters:
We have discussed two charger designs so far, which are so called linear regulators meaning they waste energy as heat to regulate output. This makes the charger less efficient, because of this battery could take a little longer to attain full charge.
The charger design we are going to discuss now is a buck converter based. Buck converters are like SMPS which is very efficient and doesn’t waste energy as heat as much as linear regulators do.
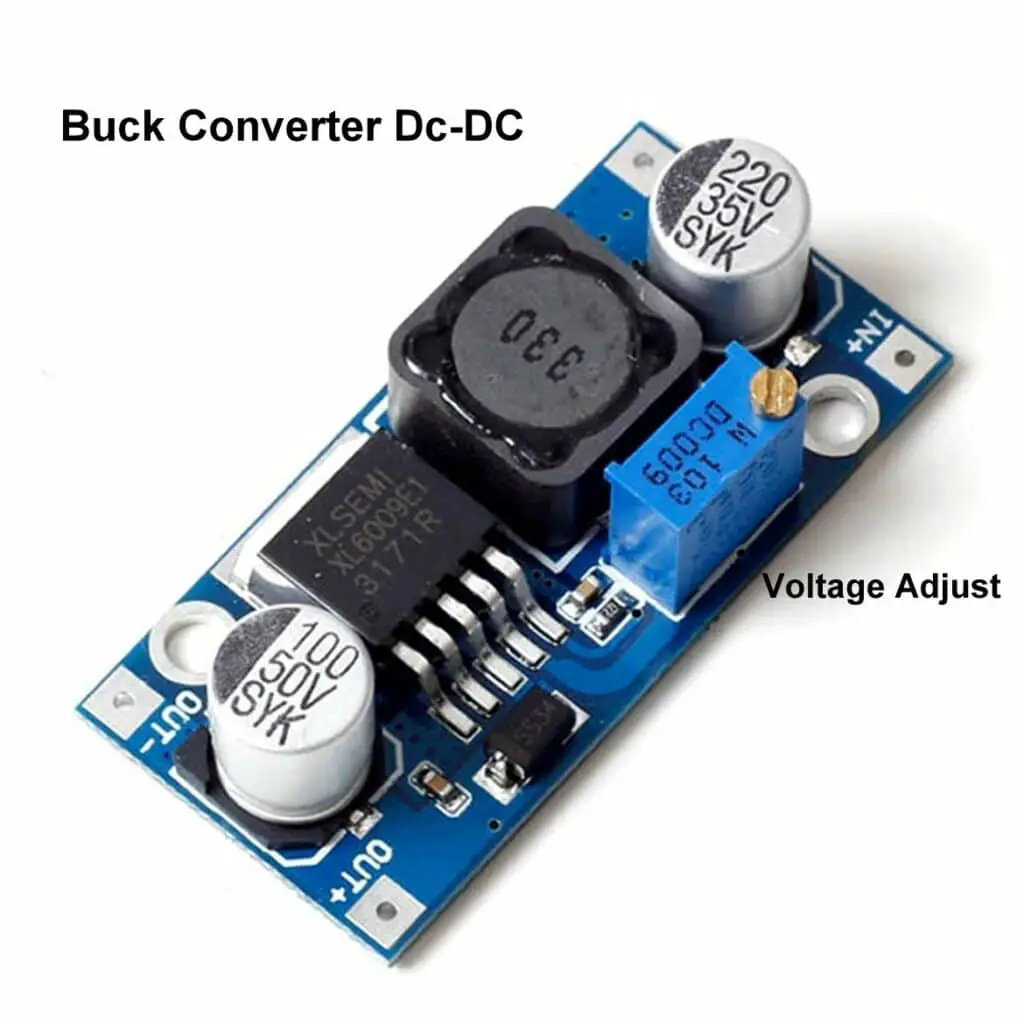
Buck converters use high frequency switching and inductor to control the supply. Explanation about buck converter is out of scope of this article, you can learn more about this on YouTube. The only thing you need to know is that buck converts are 80% to 95% efficient, while linear regulators are only 55% efficient.
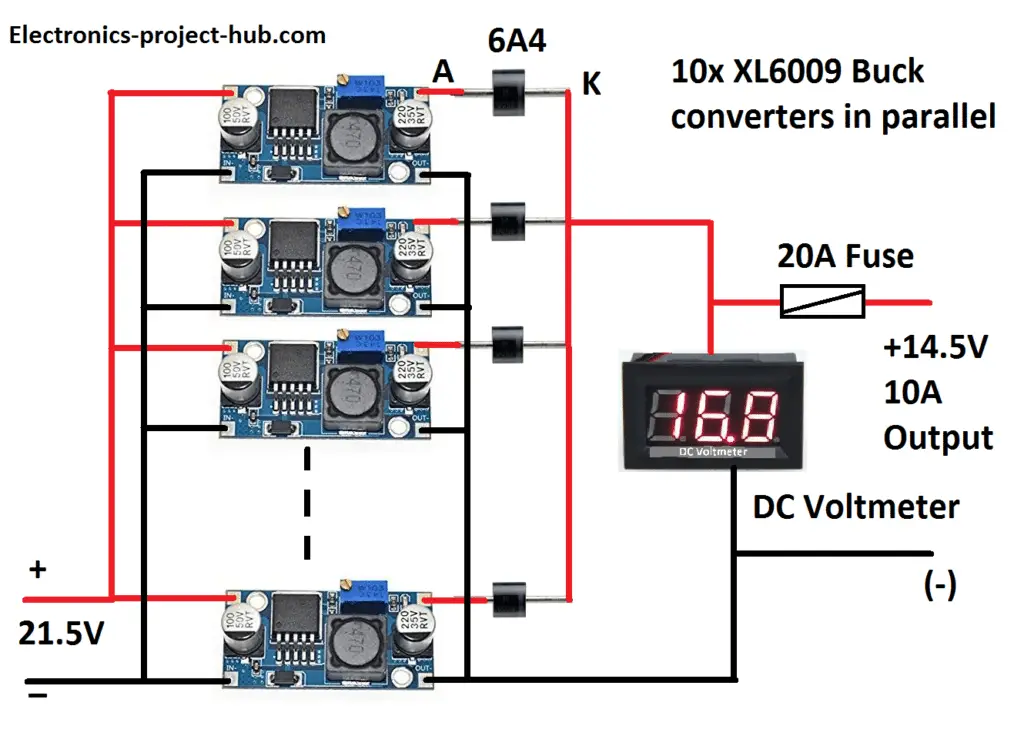
Circuit Diagram:
Circuit Description:
The circuit consists of 10 buck converter modules connected in parallel with isolation diodes. The importance of the isolation is already explained in the previous charger circuit. Each buck converter can provide 3A continuously; connecting 10 of them in parallel will reduce the load on each buck converters, consequently less heat will be dissipated making it even more efficient.
How to set the output to 14.5V using 10 buck converters?
The output of all 10 buck converters must be same and equal to 14.5V; here is the procedure to do this:
- Connect all the 10 buck converter’s input (simultaneously) to the 10A SMPS and set “+V ADJ” pre-set resistor to minimum position.
- With the help of a Phillips screw driver, set each of the buck converter output precisely to 15.2V one by one.
- Now add a diode at each buck converter’s +Ve terminal.
- When you measure the output at individual diode, it must be 14.5V [ 15.2V – 0.7V = 14.5V]
- Now you can connect all the diode outputs and GND together i.e. in parallel as shown in the circuit.
- Now connect the voltmeter and fuse. The voltmeter should read 14.5V when you turn ON the circuit.
The above circuit offers reverse voltage protection and short circuit protection via fuse. The charging procedure is same as previous two chargers.
You may also interested in: Smart 12V 7Ah battery charger circuit with LCD Display
You may also interested in : Smart Li-ion Battery Charger Circuit with LCD Display
If you have any questions regarding this project, comment your queries below, you can anticipate a guaranteed reply from us.



I am a senior technician to know creat. Some new
I also interested hobby circiut
Good!
Thanks for your educative charger circuit.Please what I really need now is not a LED ACID CHARGER but SOLAR BATTERY CHARGER (deep cycle) with low input current but high output current charger 12 -13volf,about 30Amp out put with either SOLID STATE RELAY ot MOSFET or any other component.
Thanks and waiting
We will try to make one and post it if possible in future.
Regards
Very cool project, I built a 50amp power supply, but I don’t know how to step it down, any idea!
Thanks,
Could you please explain your question a little more in depth?
Can this be used with solar panels
Hi,
Not the best design for solar panels but it works for the last two designs.
Regards
Great job.
I will like to buy one for a try if it’s working, I mean charge up to 4 (12v 200amp batteries) I will be importing for my clients.
Hi,
Currently we don’t have a wholesale or retail outlet, also shipping a test unit is not possible as international shipping from my country is suspended because of the current pandemic.
Regards
Thanks @Blogthor this knowledge 3mosfets for 10 amp it means x6=20amp why x12 =40amp I appreciate your effort to teach us here more power to your elbows sir
1. Well I am new and a beginner, I will try this and
2. I am thinking this will work for my Dc fridge battery charger and my fear is to stop charging when battery full automatically
Automatic full charge cut-off feature is not provided in this article, if possible we will try make one in future posts.
Very good!
how to make a solar regulator charger for 60 Ah or over battery ?
If possible we will try to do it in future.
Automatic charge
requirement
We will try it in future…
would this also work for a 17v , 7.9 amps laptop charger?
NO!
Hello good evening, I enjoyed you tutorial on battery charger.
But please, I have 220amps lead acid battery. Can this charger work with the battery.
Yes, but it will charge the battery slower. Take enough precaution before testing.