
How to Send Ultrasonic Sensor Data to Thingspeak
In this post we are going to learn how to upload ultrasonic sensor (HC-SR04) data to Thingspeak using Arduino and generic ESP8266 Wi-Fi module and also using NodeMCU in the second half of this article.
We will see:
- How to upload ultrasonic sensor data using ESP8266 and Arduino.
- Circuit Diagram and its program code for ESP8266 and Arduino.
- How to upload ultrasonic sensor data using NodeMCU.
- Circuit diagram and its program code for NodeMCU.
- Screen shots of uploaded sensor data on thingspeak.
- Prototype image of the circuit.
Sending Measured Data to Thingspeak Using Arduino and ESP8266:
Ultrasonic sensor need no introduction among arduino hobbyists, it is one of the first sensors you might have tried. Now you are learning about IoT and you came across Thingspeak and you want to send some data to Thingspeak server and you chose ultrasonic sensor. Well you are at the right place!
Let’s begin, Shall we?
Block Diagram:
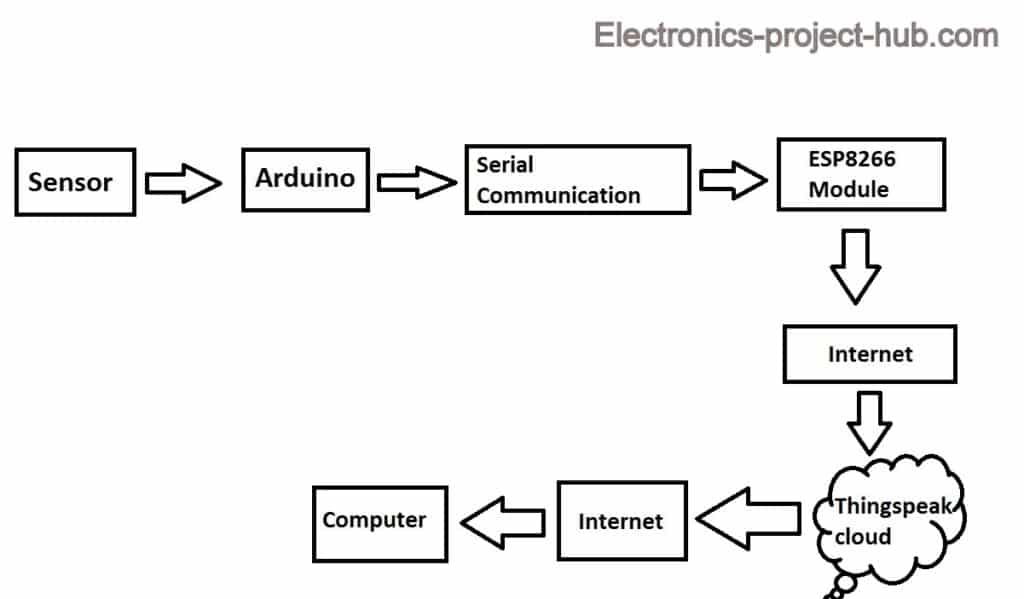
Here is the block diagram on how we are going to upload ultrasonic sensor data to Thingspeak. Firstly the Arduino will trigger the ultrasonic sensor and collects the data, after calculating the distance arduino will convey this data to ESP8266 module via UART / serial communication. The serial data consists of distance data in cm with 3 to 5 decimal places. The ESP8266 will send this data to your Thingspeak account via internet.
Since we are using a generic ESP8266 module we have to upload an appropriate program code that makes ESP8266 to accept serial data and send it to Thingspeak. We also need to upload another program code to Arduino board, so that it will convert the measured ultrasonic sensor data in serial data.
Now let’s see how to upload the program code to ESP8266 module.
Circuit Diagram:
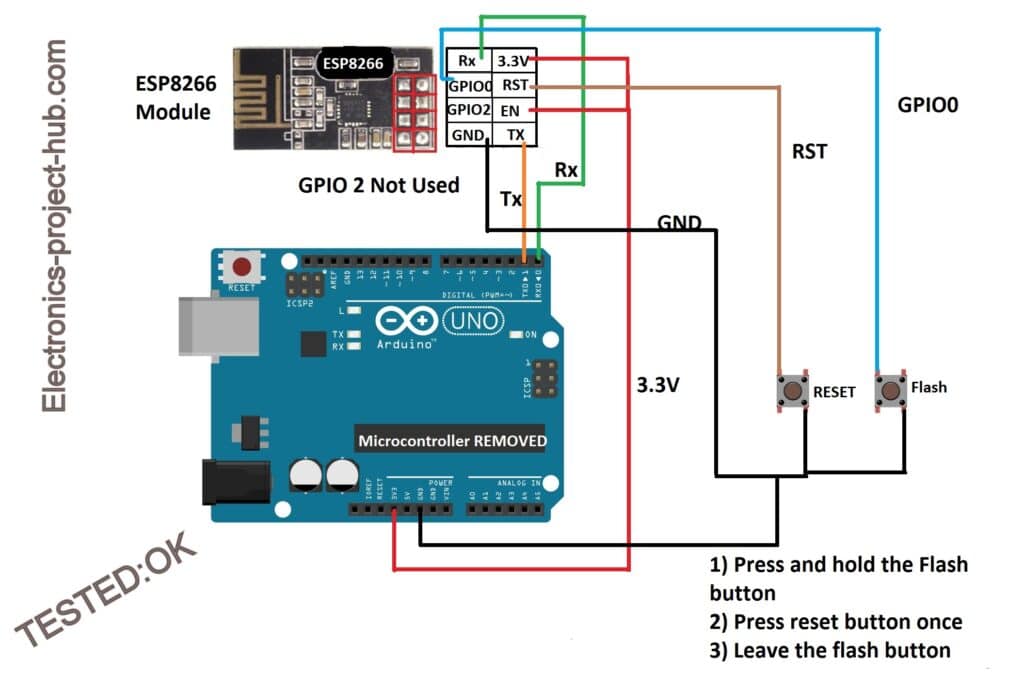
You need to wire up the circuit as illustrated above and remember that ESP8266 works on 3.3V and 5V will kill your module and make sure that ATmega328P is removed from Arduino board.
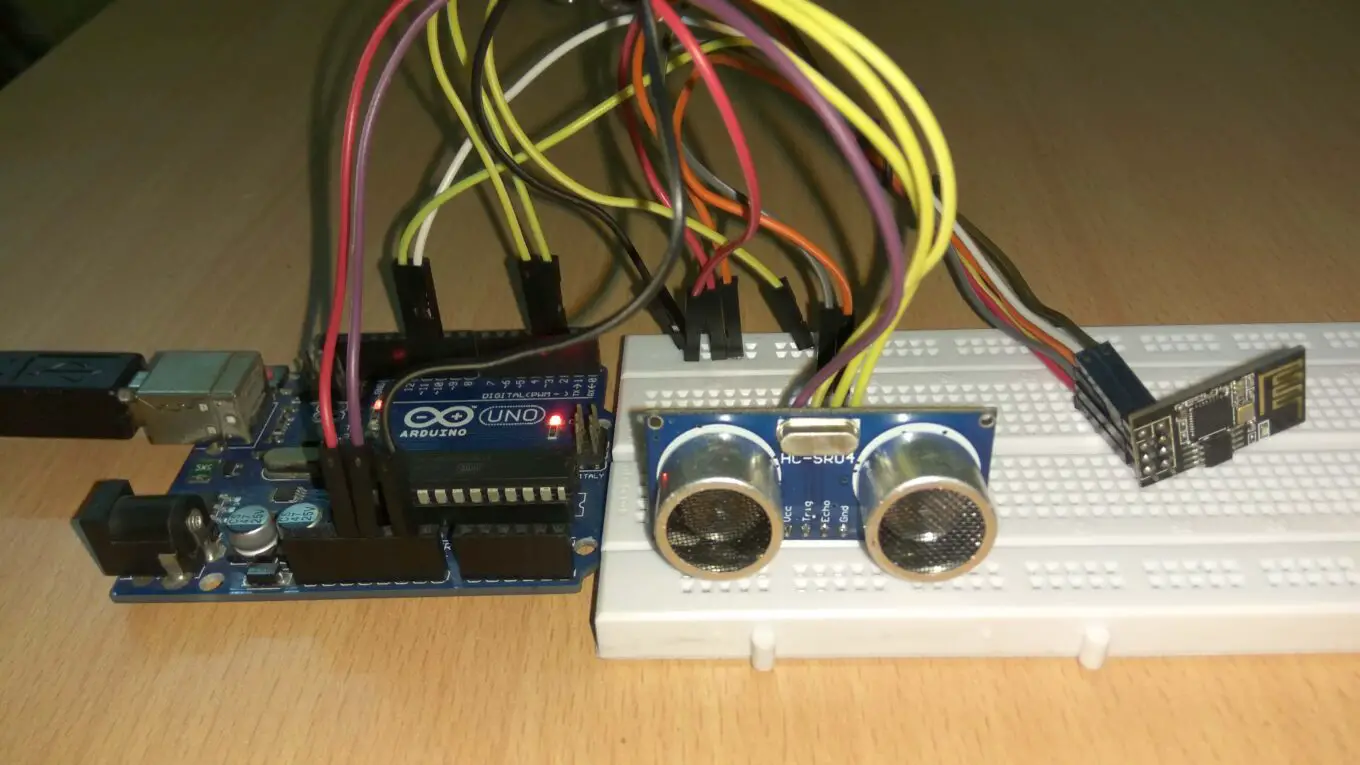
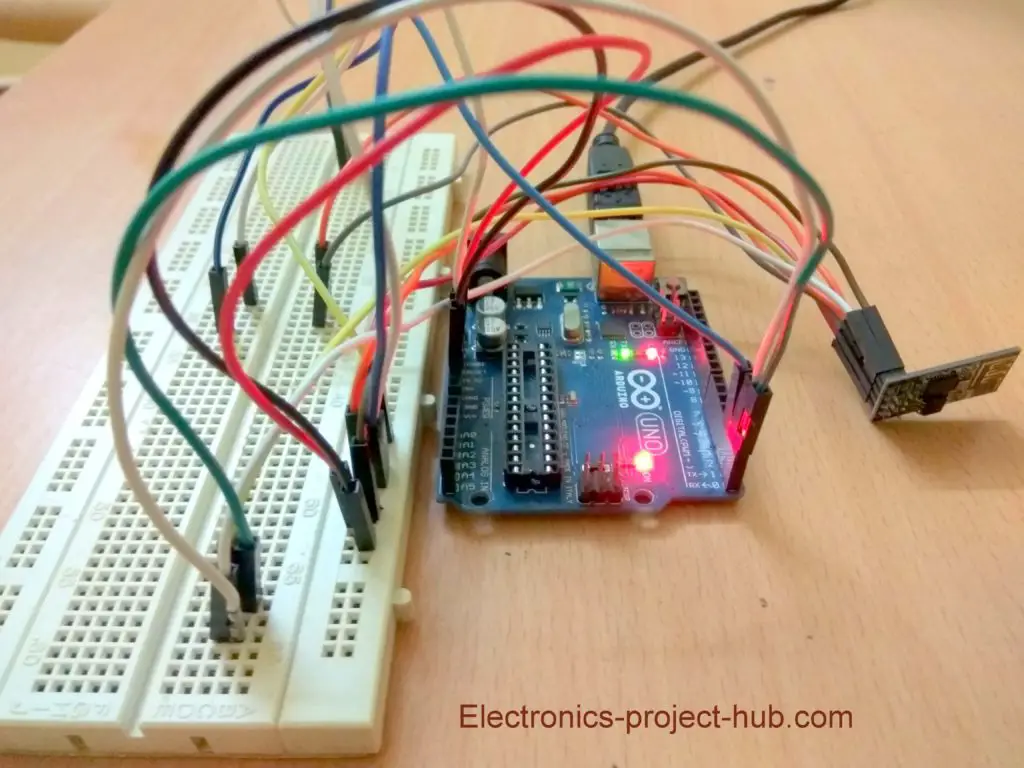
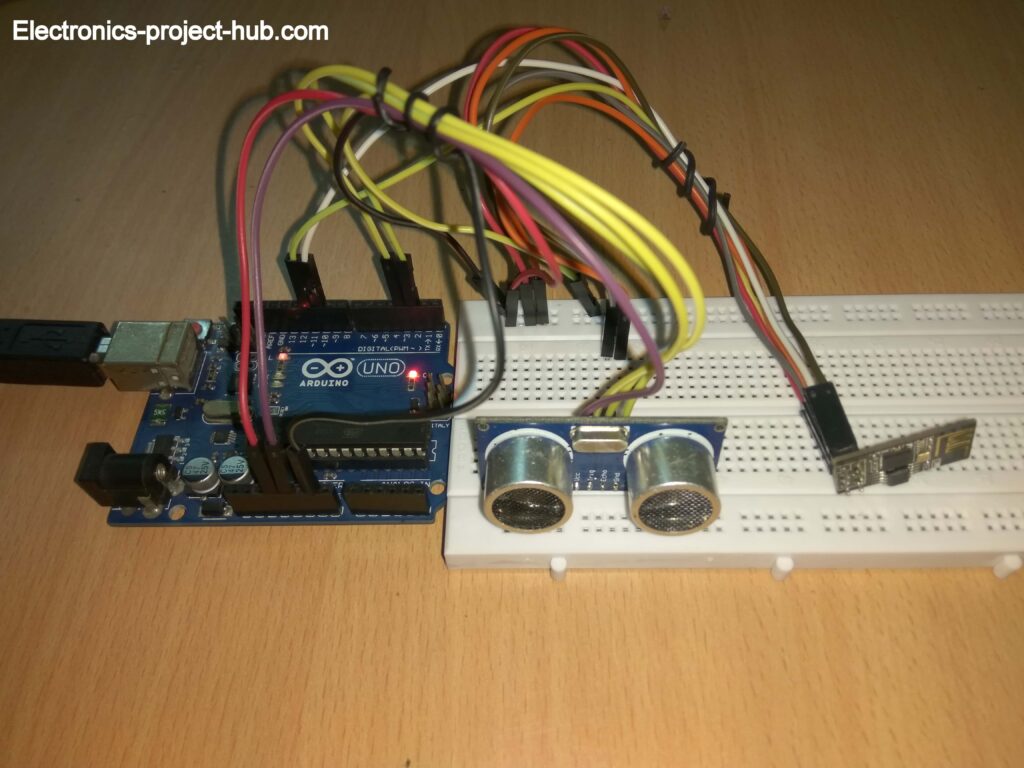
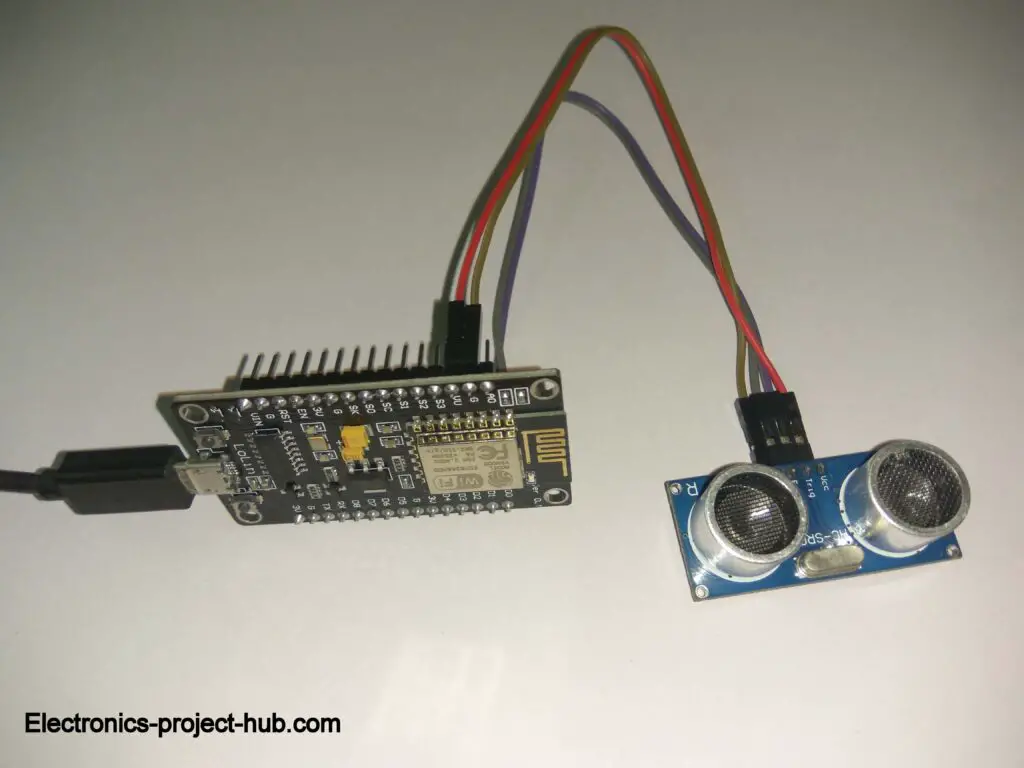
Once you wire-up it should look something like this:
How to upload the Program code:
ESP8266 won’t accept any new program code until you do this:
- Press and hold the flash button now press the reset button once and leave the flash button. Pressing buttons in reverse sequence or pressing in some other way will results in fail to upload the program code.
- Now select the board as generic ESP8266 on your IDE. You have to install the ESP8266 package to your IDE to select this board, if you haven’t done yet, Google it or watch a YouTube video on how to do so.
- Select 115200 as baud rate and select the correct COM port.
- Now click the upload button, it will take couple minutes to compile and another one minute to upload the code, so be patient.
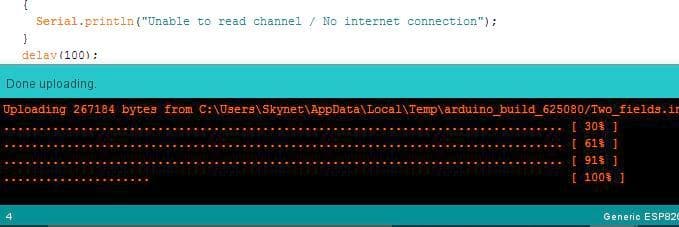
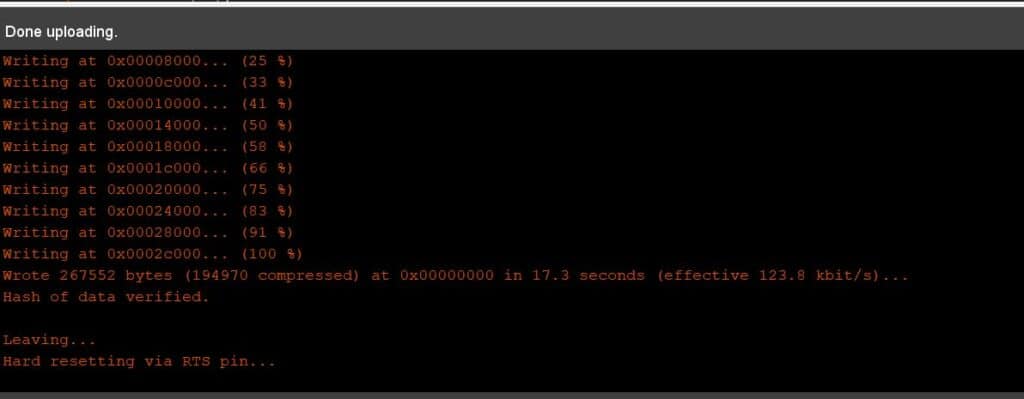
- On successful program upload you will see this:
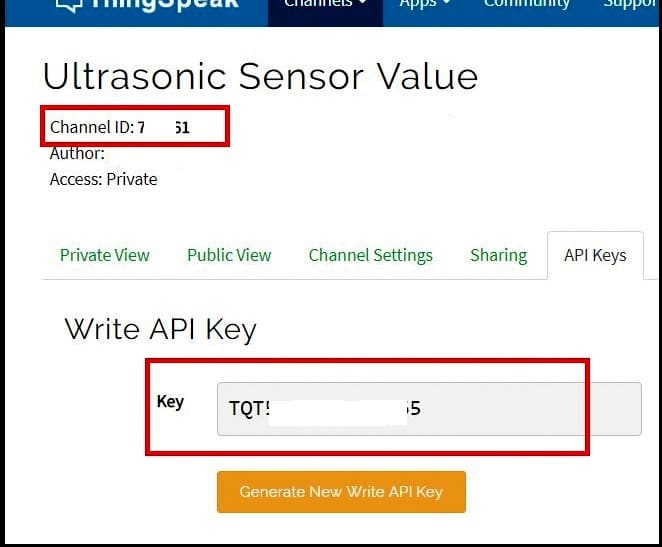
Channel settings that you need to do before you upload the code:

Go to channel settings and name it as “Ultrasonic Sensor Value” and select field 1.
Now you need to collect some information about your channel and paste the information in the program code where necessary.
You need to your channel ID and write API key.
Download Thingspeak Library, click here.
Program Code for Generic ESP8266 Module:
#include "ThingSpeak.h"
#include <ESP8266WiFi.h>

//-------- Enter Your Wi-Fi Details -----//
char ssid[] = "xxxxxxxxxx";  //SSID
char pass[] = "yyyyyyyyyy"; //Password
//--------------------------------------//

WiFiClient  client;

unsigned long myChannelField = 123456; // Channel ID
const int ChannelField = 1; // Which To Field Write
const char * myWriteAPIKey = "xxxxxxxxxxxxxx"; // Write API Key

String value = "";
void setup()
{
  Serial.begin(115200);
  WiFi.mode(WIFI_STA);
  ThingSpeak.begin(client);
}
void loop()
{
  if (Serial.available() > 0)
  {
    while (Serial.available() > 0)
    {
      int inChar = Serial.read();
      value += (char)inChar;
    }
  }
  if (WiFi.status() != WL_CONNECTED)
  {
    while (WiFi.status() != WL_CONNECTED)
    {
      WiFi.begin(ssid, pass);
      delay(5000);
    }
  }
  ThingSpeak.writeField(myChannelField, ChannelField, value, myWriteAPIKey);
  value = "";
}
Don’t forget the change the following:
//----------- Enter you Wi-Fi Details---------//
char ssid[] = "xxxxxxxx"; //SSID
char pass[] = "yyyyyyyy"; // Password
//-------------------------------------------//
unsigned long myChannelField = 123456; // Channel ID
const char * myWriteAPIKey = "xxxxxxxxxxxxxx"; // Write API Key
Once you successfully upload this code to ESP8266, you need rewire and upload another code to Arduino board.
Circuit Diagram:
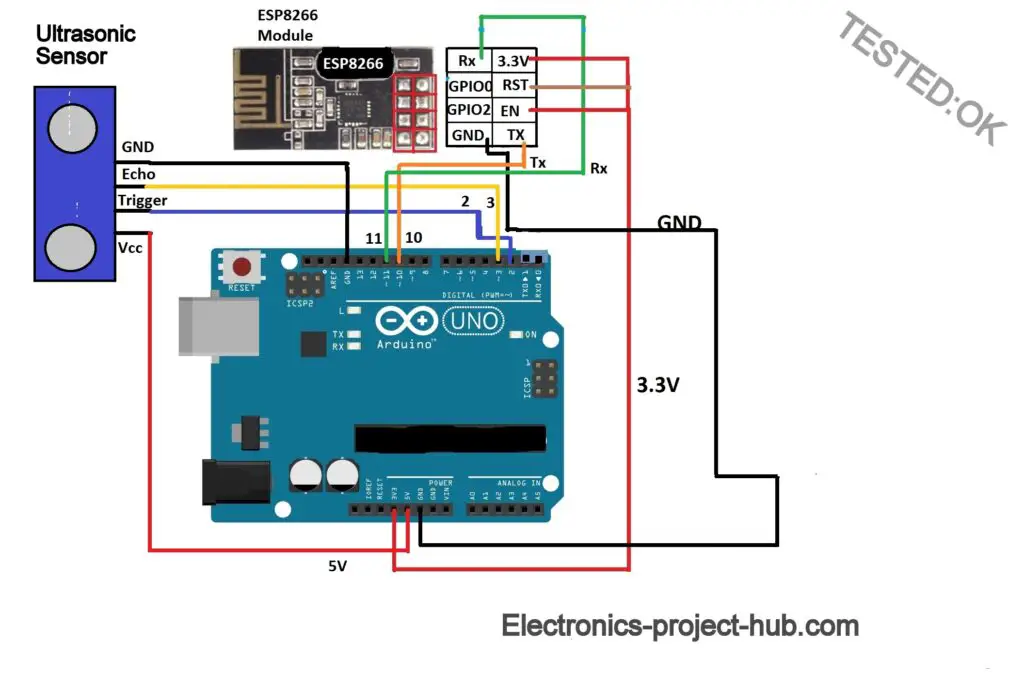
You need to rewire the circuit as illustrated above and insert the IC back to Arduino board.
Program code for Arduino:
#include <SoftwareSerial.h>
SoftwareSerial ESP(10,11);
const int trigger = 2;
const int echo = 3;
long T;
float distanceCM;
void setup()
{
  pinMode(trigger, OUTPUT);
  pinMode(echo, INPUT);
  Serial.begin(115200);
  ESP.begin(115200);
}
void loop()
{
  digitalWrite(trigger, LOW);
  delay(1);
  digitalWrite(trigger, HIGH);
  delayMicroseconds(10);
  digitalWrite(trigger, LOW);
  T = pulseIn(echo, HIGH);
  distanceCM = T * 0.034;
  distanceCM = distanceCM / 2;
  Serial.print("Distance in cm: ");
  Serial.println(distanceCM);
  ESP.print(distanceCM);
  delay(1000);
}
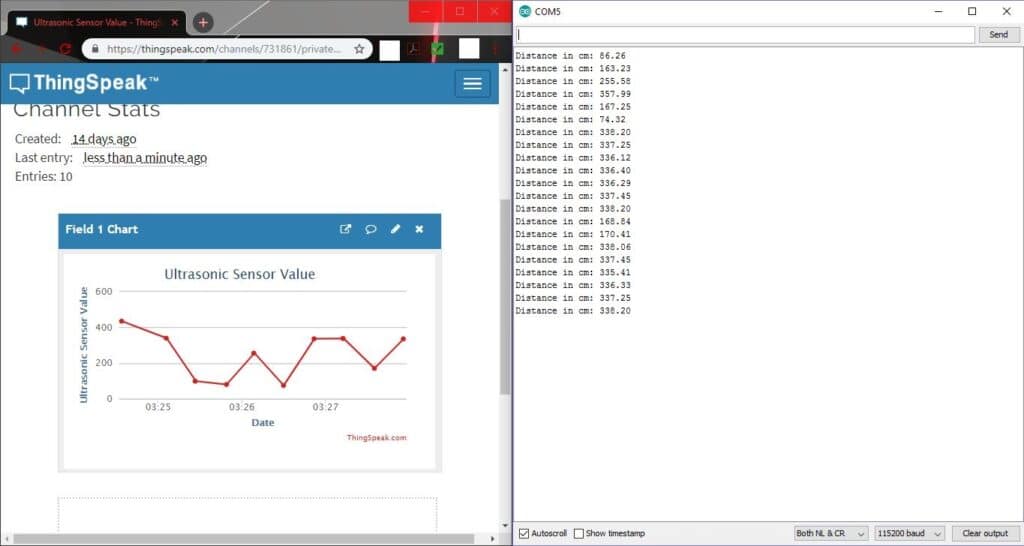
After uploading this code to Arduino board, open the serial monitor at 115200 baud rate to see the measurement and open your browser to see the incoming data on Thingspeak.
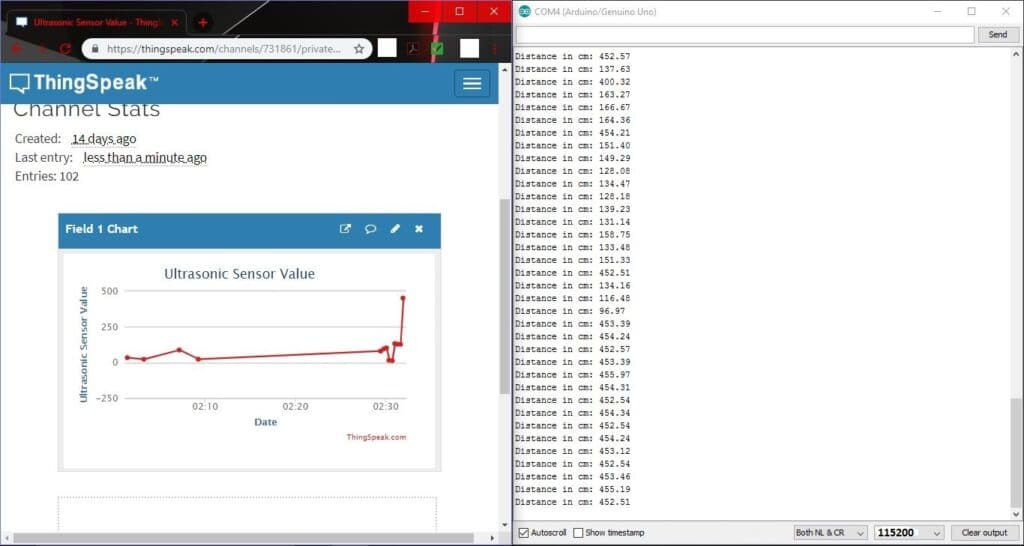
You might have noticed that data updating on Thingspeak is much slower than that of serial monitor. This is normal; it takes more than 15 seconds to update the data on Thingspeak.
Prototype:
How to Send Ultrasonic Sensor Data using NodeMCU
NodeMCU makes IoT development a lot easier since it has enough I/O pins and built-in Wi-Fi ESP8266 module. So you no need manage with complexity that Arduino and generic ESP8266 had.
Circuit diagram:
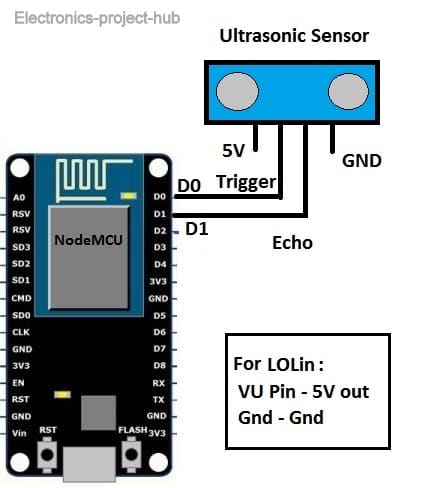
As you can see the circuit is very simple, just connect the ultrasonic sensor and you are ready to upload the program code.
Download Thingspeak library, click here
Program code for NodeMCU:
#include "ThingSpeak.h"
#include <ESP8266WiFi.h>

//----------- Enter you Wi-Fi Details---------//
char ssid[] = "xxxxxxxx"; //SSID
char pass[] = "yyyyyyyy"; // Password
//-------------------------------------------//

const int trigger = 16;
const int echo = 5;
long T;
float distanceCM;
WiFiClient  client;

unsigned long myChannelField = 123456; // Channel ID
const int ChannelField = 1; // Which channel to write data
const char * myWriteAPIKey = "xxxxxxxxxxx"; // Your write API Key

void setup()
{
  Serial.begin(115200);
  pinMode(trigger, OUTPUT);
  pinMode(echo, INPUT);
  WiFi.mode(WIFI_STA);
  ThingSpeak.begin(client);
}
void loop()
{
  if (WiFi.status() != WL_CONNECTED)
  {
    Serial.print("Attempting to connect to SSID: ");
    Serial.println(ssid);
    while (WiFi.status() != WL_CONNECTED)
    {
      WiFi.begin(ssid, pass);
      Serial.print(".");
      delay(5000);
    }
    Serial.println("\nConnected.");
  }
  digitalWrite(trigger, LOW);
  delay(1);
  digitalWrite(trigger, HIGH);
  delayMicroseconds(10);
  digitalWrite(trigger, LOW);
  T = pulseIn(echo, HIGH);
  distanceCM = T * 0.034;
  distanceCM = distanceCM / 2;
  Serial.print("Distance in cm: ");
  Serial.println(distanceCM);
  ThingSpeak.writeField(myChannelField, ChannelField, distanceCM, myWriteAPIKey);
  delay(1000);
}
Don’t forget to change the following:
//----------- Enter you Wi-Fi Details---------//
char ssid[] = "xxxxxxxx"; //SSID
char pass[] = "yyyyyyyy"; // Password
//-------------------------------------------------//
unsigned long myChannelField = 123456; // Channel ID
const char * myWriteAPIKey = "xxxxxxxxxxx"; // Your write API Key
You need to paste your channel details in the code as mentioned in the first half of this post.
How to Upload Code to NodeMCU:
- Connect the NodeMCU with micro USB cable to your PC.
- Press and hold flash button and press the reset button once and now you leave the flash button.
- Select the NodeMCU v1.0 as board.
- Select 115200 as baud rate and select the correct COM port.
- Press upload button, it may take 2 min to compile the code and another one minute to upload to NodeMCU.
On successful program upload to NodeMCU, you will see this:
OR, you will see this on successful code upload to NodeMCU:
Data uploaded to Thingspeak and Serial Monitor:
Prototype:
If you have any questions regarding this project, feel free to ask us in the comments, you will get a guaranteed reply from us.
Blogthor
My nick name is blogthor, I am a professional electronics engineer specialized in Embedded System. I am a experienced programmer and electronics hardware developer. I am the founder of this website, I am also a hobbyist, DIYer and a constant learner. I love to solve your technical queries via comment section.

mail me sir i have a question. abeljraguilar@gmail.com
Hi helro,
You can ask all your questions in the comments so that others will also benifit.
Regards
Hi Sir,
How to upload data from IR sensor on ThingSpeak using particle board?
Please help me sir.
Hi,
Please elaborate your idea only then we can evaluate whether your idea project is feasible for us to do or not.
Regards
Hi,
Please elobrate your probem that you are facing.
Regards
Hir Sir. how to counter something by using ultrasonic sensor with nodemcu then send to thingspeak, Im just using your code to send data to thingspeak. but when i change the code to count it only show 0. please help me sir.
Hi,
I didn’t understand your question ” how to counter something by using ultrasonic sensor”
Please ask in a understandable way…
Regards
sorry sir,, i means to count the person.
You need to send the same data multiple times to get updated on thingspeak. Send data one time leads to failure.
Regards
okayy sir thanks for your explaination. i will try. thankyousomuch.
Why I always get this message..
Leaving…
Hard resetting via RTS pin…
Please help me I am a beginner in this. here’s the full (error?) message:
Sketch uses 277656 bytes (26%) of program storage space. Maximum is 1044464 bytes.
Global variables use 27328 bytes (33%) of dynamic memory, leaving 54592 bytes for local variables. Maximum is 81920 bytes.
esptool.py v2.6
2.6
esptool.py v2.6
Serial port COM4
Connecting….
Chip is ESP8266EX
Features: WiFi
MAC: bc:dd:c2:2f:c6:e0
Uploading stub…
Running stub…
Stub running…
Configuring flash size…
Auto-detected Flash size: 4MB
Compressed 281808 bytes to 203301…
Writing at 0x00000000… (7 %)
Writing at 0x00004000… (15 %)
Writing at 0x00008000… (23 %)
Writing at 0x0000c000… (30 %)
Writing at 0x00010000… (38 %)
Writing at 0x00014000… (46 %)
Writing at 0x00018000… (53 %)
Writing at 0x0001c000… (61 %)
Writing at 0x00020000… (69 %)
Writing at 0x00024000… (76 %)
Writing at 0x00028000… (84 %)
Writing at 0x0002c000… (92 %)
Writing at 0x00030000… (100 %)
Wrote 281808 bytes (203301 compressed) at 0x00000000 in 18.0 seconds (effective 125.1 kbit/s)…
Hash of data verified.
Leaving…
Hard resetting via RTS pin…
Thank You..
These results don’t resemble like Arduino IDE from our experience. Can you tell us which software you are using???
You need to compile the code in Arduino IDE.
Regards
Could you explain your issue please so that we can help you out.
This is a well tested project, if it works for us, it should work for everyone else if they done everything correct.
Regards
okay, understood now..
Your code got uploaded to NodeMCU successfully. The reason why you are getting different information on Arduino IDE’s bottom is because you probably installed ESP32 board core files before, if so the uploading progress dots will be different.
Regards
Hi there,
Can you use ifttt and send a massage if the distance is changing – let’s say from 150 cm to 50 cm over night?
How would you program this feature?
Regards
Jimmy
We are not familiar with IFTTT, we will look in to this in future.
Regards
Sir,
I want to send the sensor data to thing-speak only when sensor measure certain value
Ex: when sensor measure multiple of 50 as its distance
please help me with this.
Hi Krian,
Sorry, currently we don’t customize existing project to users yet, may be in future.
Regards
please sir answer this i really need to know, my code is successfully upload, but why it doesn’t do anything? it doesn’t send anything to thingspeak,
Hi,
Which one are you referring to? using NodeMCU or using generic ESP8266?
Make sure you inserted all your credentials correctly in the code.
Distance measurement should appear on serial monitor.
Regards
Hi, my code is successfully uploaded, but why it doesn’t do anything, the distance is not shown in the serial monitor and it doesn’t send anything to thingspeak, I’m using NodeMCU Lua.
I connect Ultrasonic Sensor Gnd to NodeMCU Gnd, Echo pin to D1, Trigger Pin to D0, and VCC to 3v3.
I’m a bit confused which pin I should connect the VCC pin either Vin or 3v3 pin,
Hi,
You need to connect the ultrasonic sensor’s 5V terminal pin to 5V output of NodeMCU not to 3.3V. Find the pin on your NodeMCU that can supply 5V to your ultrasonic sensor.
Regards
Hello sir,
My project is to measure and monitor blood glucose. I have an issue which is to send data (glucose concentration) from arduino to mobile app via wifi..
Can you sir provide me with a code so that i can send data from arduino to thingspeak to mobile app???
I really do need it ?
Hi,
Sorry, we don’t have a code for your requirements or an App.
Sir ,this is deepak,iam getting a “fata error:timed out for packet headers” is there any solution to that
Hi,
I think you are not able to upload code to ESP8266, right?
You have to press Flash and rest button in the correct sequence before uploading the code.
If you did it correct and still could not upload, check the wiring and more importantly you should have removed the microcontroller IC from Arduino board.
If you did everything correct there could be some damage on your ESP8266 because you accidentally applied 5V, but this should be your last assumption.
Regards
doe is it take too long to connect wifi sir??
my problem is like this….
23:48:53.603 -> ………………………………………………………………………………………
Hi,
It could be due to the incorrect password or SSID that you entered to the code, in this case it won’t connect at all.
If it is taking too long to connect (and eventually connects), please try bringing the project near to your Wi-Fi router so that it will get good signal strength.
Normally it would connect to Wi-Fi instantly.
Regards
I need your help Is this program correct or not?
#include “ThingSpeak.h”
#include
const int LV25P = A0;
const int LA25P =A1;
//———– Enter you Wi-Fi Details———//
char ssid[] = “GALAXY”; //SSID
char pass[] = “123456789”; // Password
//——————————————-//
WiFiClient client;
unsigned long myChannelNumber = 913578; // Channel ID here
const char * myWriteAPIKey = “F1QMBKG2P43HXOLT”; // Your Write API Key here
const int FieldSNumber =2;
const int FieldVNumber =1;
//###################################### void setup ########################################
void setup()
{
Serial.begin(9600);
ThingSpeak.begin(client);
WiFi.begin(ssid, pass);
Serial.print(“Attempting to connect to : “);
Serial.println(ssid);
while (WiFi.status() != WL_CONNECTED)
{
Serial.print(“.”);
delay(1000);
}
Serial.println(“\nConnected.”);
}
//##################################### void loop #######################################################
void loop()
{
int valtension = analogRead(LV25P);
// Mesure la tension sur la broche A0
float tension = valtension * (5000/ 1023.0);
// Transforme la mesure (nombre entier) en tension via un produit en croix
Serial.println(“valtension_en volt=”);
Serial.print(tension);
// Envoi la mesure au PC pour affichage et attends 1s
delay(1000);
int valcourant = analogRead(LA25P);
float courant = valcourant * (5000 / 1023.0);
Serial.println(“valcourant_en ampere=”);
Serial.print(courant);
delay(1000);
ThingSpeak.writeField(myChannelNumber, FieldSNumber , tenion, myWriteAPIKey);
delay(2000);
ThingSpeak.writeField(myChannelNumber, FieldVNumber, courant, myWriteAPIKey);
delay(10000);
}
There is an error in the second line where the inclusion of ESP8266.h library file is missing and if our observations are correct we did not find any other errors, please confirm it with your hardware.
Regards
hi
I get a constant value of 0.07 and I’ve tried everything but it still doesn’t read values
Hi,
I believe your ultrasonic sensor is not working properly / malfunctioned, try a replacement.
Regards
It is an informative post about uploading ultrasonic sensor data to Thingspeak. The block diagram shown is informative as well. Thanks for sharing this with us!
Hola
Este, soy muy nuevo en arduino tengo el sensor ultrasonico HC-SR04 y Tarjeta:”LOLIN(WEMOS) D1 mini Pro este código es compatible con esta tarjeta.
Saludos
Hola,
Sí, desde nuestro supuesto, el código debería funcionar bien …
Hello,
If I am using 3 Ultrasonic sensors and pir sensors, so total of 6 sensors. I also have a Node MCU and an Arduino UNO. How can I send the data of all the sensors to Thingspeak as there are not enough ports on Node Mcu for that.
Hi,
Yes, there aren’t enough pins on nodeMCU for your specific requirement. You can use your Arduino board and send the data serially to NodeMCU which then sends the data to Thingspeak. The coding has to be written from the core.
Regards
Hi, may I know where do you get ESP8266WiFi.h library? As my coding has error if WiFi class has no member name ‘mode’ and i think is because of my library..
Hi,
You need to select the ESP8266 board first and then compile, also you should have installed ESP8266 board package to your Arduino IDE.
Regards
Hello Sir I want to upload ultrasonic sensor data to the firebase real-time database. sir, please help me. it is my college project
thank you, dear sir.
We are sorry Manish, we aren’t experienced with firebase.
Arduino: 1.8.13 (Windows Store 1.8.42.0) (Windows 10), Board: “Generic ESP8266 Module, 80 MHz, Flash, Legacy (new can return nullptr), All SSL ciphers (most compatible), dtr (aka nodemcu), 26 MHz, 40MHz, DOUT (compatible), 1MB (FS:64KB OTA:~470KB), 2, nonos-sdk 2.2.1+100 (190703), v2 Lower Memory, Disabled, None, Only Sketch, 115200”
Executable segment sizes:
IROM : 228624 – code in flash (default or ICACHE_FLASH_ATTR)
IRAM : 26756 / 32768 – code in IRAM (ICACHE_RAM_ATTR, ISRs…)
DATA : 1248 ) – initialized variables (global, static) in RAM/HEAP
RODATA : 688 ) / 81920 – constants (global, static) in RAM/HEAP
BSS : 24880 ) – zeroed variables (global, static) in RAM/HEAP
Sketch uses 257316 bytes (26%) of program storage space. Maximum is 958448 bytes.
Global variables use 26816 bytes (32%) of dynamic memory, leaving 55104 bytes for local variables. Maximum is 81920 bytes.
esptool.py v2.8
Serial port COM4
Connecting…….._____….._____….._____….._____….._____….._____….._____
Traceback (most recent call last):
File “C:\Users\Nikil\Documents\ArduinoData\packages\esp8266\hardware\esp8266\2.7.3/tools/upload.py”, line 65, in
esptool.main(cmdline)
File “C:/Users/Nikil/Documents/ArduinoData/packages/esp8266/hardware/esp8266/2.7.3/tools/esptool\esptool.py”, line 2890, in main
esp.connect(args.before)
File “C:/Users/Nikil/Documents/ArduinoData/packages/esp8266/hardware/esp8266/2.7.3/tools/esptool\esptool.py”, line 483, in connect
raise FatalError(‘Failed to connect to %s: %s’ % (self.CHIP_NAME, last_error))
esptool.FatalError: Failed to connect to ESP8266: Timed out waiting for packet header
esptool.FatalError: Failed to connect to ESP8266: Timed out waiting for packet header
This report would have more information with
“Show verbose output during compilation”
option enabled in File -> Preferences.
Sir, Plz help me in solving this issue.
Hi,
It seems like you did not press the reset and flash buttons in the correct sequence or the Tx / Rx are not connection correctly.
SEND MULTIPLE DATA TO THINKSPEAK
Can you please elaborate more……..
Hi there,
I’ve followed your circuit diagram also the code. for the generic code it works, but for the arduino code with ultrasonic sensor I’m getting this error,,, “conflicting declaration ‘SoftwareSerial ESP’ I hope you see this.
Hi, For compiling the code for Arduino, please select the board as Arduino uno/nano or which ever arduino board you are using, but not as ESP8266.
Hi, Im making a project that can measure the water level..
and I need to measure it by calibrating the distance..
example:
if the distance <= 20 then it will send to the thingspeak fields..
pls help sir.. thanks
Hi,
You need to write the “if” condition to the void loop function and execute ESP.print function.
Regards
HI!
CAN U TELL THE CONNECTIONS PART! IN CODE TRIG PIN IS WRITTEN 16! WHAT IS 16 IN NODEMCU?
PLS ELLABORATE OR TELL THE CONNECTIONS PART.
THANK YOU
Hi,
Sorry for the delayed reply. Pin D1 and D2 of NodeMCU are pins 16 and 5 respectively. Since we are writing the code on Arduino IDE their pins maps are different.
You can get Arduino pin diagram for nodeMCU on internet.
Regards
Dear Sir, I do not have a removable IC on my Arduino UNO board and Flash and Reset buttons are already available on my ESP8266 board. What precautions/changes I need to take to run this program please ?
Buy a ESP8266 programmer USB module.
You did connection with arduino uno, so you have removed microcontroller. But for Arduino mega…how to do it? please reply asap.
Hi,
You can buy a ESP8266 programmer module.